Rest service CRUD operations with JSP and ajax
In the previous article, we have seen CRUD operations in Rest service with Advanced rest client
Let’s do the same using JSP page and ajax as a client
Requirement :
Perform CRUD operations on USER object.
We have User Domain object, we can insert User data, read the inserted data,
Update some user information and finally delete the user data.
Create a new Maven Web project in eclipse (Refer Rest service Hello World project for the same)
Step 1
Update pom.xml with below dependencies
- <project xmlns="http://maven.apache.org/POM/4.0.0"
- xmlns:xsi="http://www.w3.org/2001/XMLSchema-instance"
- xsi:schemaLocation="http://maven.apache.org/POM/4.0.0
- http://maven.apache.org/maven-v4_0_0.xsd">
- <modelVersion>4.0.0</modelVersion>
- <groupId>CRUDWithRestAndJSP</groupId>
- <artifactId>CRUDWithRestAndJSP</artifactId>
- <packaging>war</packaging>
- <version>0.0.1-SNAPSHOT</version>
- <name>CRUDWithRestAndJSP Maven Webapp</name>
- <url>http://maven.apache.org</url>
- <dependencies>
- <dependency>
- <groupId>junit</groupId>
- <artifactId>junit</artifactId>
- <version>3.8.1</version>
- <scope>test</scope>
- </dependency>
- <dependency>
- <groupId>junit</groupId>
- <artifactId>junit</artifactId>
- <version>3.8.1</version>
- <scope>test</scope>
- </dependency>
- <dependency>
- <groupId>org.glassfish.jersey.containers</groupId>
- <artifactId>jersey-container-servlet</artifactId>
- <version>2.24</version>
- </dependency>
- <dependency>
- <groupId>javax.xml</groupId>
- <artifactId>jaxb-api</artifactId>
- <version>2.1</version>
- </dependency>
- <dependency>
- <groupId>javax.servlet</groupId>
- <artifactId>servlet-api</artifactId>
- <version>2.5</version>
- </dependency>
- <dependency>
- <groupId>org.webjars</groupId>
- <artifactId>jquery</artifactId>
- <version>2.1.4</version>
- </dependency>
- </dependencies>
- <build>
- <finalName>CRUDWithRestAndJSP</finalName>
- </build>
- </project>
<project xmlns="http://maven.apache.org/POM/4.0.0"
         xmlns:xsi="http://www.w3.org/2001/XMLSchema-instance"
         xsi:schemaLocation="http://maven.apache.org/POM/4.0.0
         http://maven.apache.org/maven-v4_0_0.xsd">
  <modelVersion>4.0.0</modelVersion>
  <groupId>CRUDWithRestAndJSP</groupId>
  <artifactId>CRUDWithRestAndJSP</artifactId>
  <packaging>war</packaging>
  <version>0.0.1-SNAPSHOT</version>
  <name>CRUDWithRestAndJSP Maven Webapp</name>
  <url>http://maven.apache.org</url>

 <dependencies>
       <dependency>
              <groupId>junit</groupId>
              <artifactId>junit</artifactId>
              <version>3.8.1</version>
              <scope>test</scope>
       </dependency>

      <dependency>
              <groupId>junit</groupId>
              <artifactId>junit</artifactId>
              <version>3.8.1</version>
              <scope>test</scope>
      </dependency>

      <dependency>
              <groupId>org.glassfish.jersey.containers</groupId>
              <artifactId>jersey-container-servlet</artifactId>
              <version>2.24</version>
      </dependency>

      <dependency>
              <groupId>javax.xml</groupId>
              <artifactId>jaxb-api</artifactId>
              <version>2.1</version>
      </dependency>

      <dependency>
              <groupId>javax.servlet</groupId>
              <artifactId>servlet-api</artifactId>
              <version>2.5</version>
      </dependency>

      <dependency>
              <groupId>org.webjars</groupId>
              <artifactId>jquery</artifactId>
              <version>2.1.4</version>
      </dependency>

  </dependencies>

 <build>
    <finalName>CRUDWithRestAndJSP</finalName>
 </build>

</project>
We have added dependencies for Jersey servlet,Jaxb,servelt api , jquery and Junit in the above pom file.
Step 2
Update web.xml file with Jersey servlet container
we have defined a special servlet called “jersey-serlvet” in web.xml and mapped it by the URL pattern /rest/*
So just like any other servlet in web application,any request matching with the given pattern i.e /rest/* will be redirected to “Jersey servelt”.
- <!DOCTYPE web-app PUBLIC
- "-//Sun Microsystems, Inc.//DTD Web Application 2.3//EN"
- "http://java.sun.com/dtd/web-app_2_3.dtd" >
- <web-app>
- <display-name>Archetype Created Web Application</display-name>
- <servlet>
- <servlet-name>jersey-serlvet</servlet-name>
- <servlet-class>org.glassfish.jersey.servlet.ServletContainer</servlet-class>
- <init-param>
- <param-name>jersey.config.server.provider.packages</param-name>
- <param-value>com.kb.rest.resource</param-value>
- </init-param>
- <load-on-startup>1</load-on-startup>
- </servlet>
- <servlet-mapping>
- <servlet-name>jersey-serlvet</servlet-name>
- <url-pattern>/rest/*</url-pattern>
- </servlet-mapping>
- </web-app>
<!DOCTYPE web-app PUBLIC
 "-//Sun Microsystems, Inc.//DTD Web Application 2.3//EN"
 "http://java.sun.com/dtd/web-app_2_3.dtd" >

<web-app>
    <display-name>Archetype Created Web Application</display-name>
       <servlet>
		<servlet-name>jersey-serlvet</servlet-name>
		 <servlet-class>org.glassfish.jersey.servlet.ServletContainer</servlet-class>
		<init-param>
			<param-name>jersey.config.server.provider.packages</param-name>
			<param-value>com.kb.rest.resource</param-value>
		</init-param>
		<load-on-startup>1</load-on-startup>
       </servlet>

	<servlet-mapping>
		<servlet-name>jersey-serlvet</servlet-name>
		<url-pattern>/rest/*</url-pattern>
	</servlet-mapping>
</web-app>
We have also provided the package of java classes(to be qualified as Rest services) under init-param tag.
This package will be considered by Jersey servlet container to identify the actual service when the request comes in.
Step 3
Create a domain class which represents the data with JAXB
We will perform CRUD operations on this object.
- package com.kb.model;
- import java.util.Date;
- import javax.xml.bind.annotation.XmlElement;
- import javax.xml.bind.annotation.XmlRootElement;
- @XmlRootElement(name="User")
- public class User {
- private String id;
- private String name;
- private int age;
- public String getId() {
- return id;
- }
- @XmlElement
- public void setId(String id) {
- this.id = id;
- }
- public String getName() {
- return name;
- }
- @XmlElement
- public void setName(String name) {
- this.name = name;
- }
- public int getAge() {
- return age;
- }
- @XmlElement
- public void setAge(int age) {
- this.age = age;
- }
- }
package com.kb.model;

import java.util.Date;

import javax.xml.bind.annotation.XmlElement;
import javax.xml.bind.annotation.XmlRootElement;

@XmlRootElement(name="User")
public class User {
	private String id;
	private String name;
	private int age;
	public String getId() {
		return id;
	}

	@XmlElement
	public void setId(String id) {
		this.id = id;
	}
	public String getName() {
		return name;
	}

	@XmlElement
	public void setName(String name) {
		this.name = name;
	}
	public int getAge() {
		return age;
	}

	@XmlElement
	public void setAge(int age) {
		this.age = age;
	}
}
We have created a User class with id,name and age to represent the data
@XmlRootElement – specifies the root tag of each user record in xml.
@XmlElement – specifies the child element for each attribute of User record.
Create the UI pages for CRUD operations
Step 4
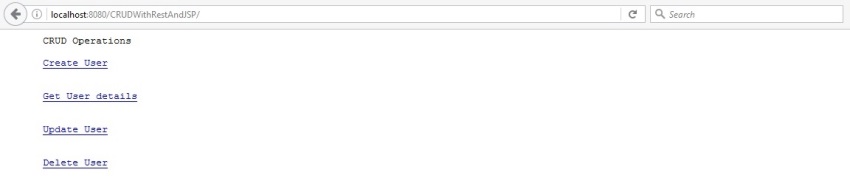
Create a home page which can display the links for each of the CRUD operation.
Index.jsp
- <!DOCTYPE html>
- <%@ page isELIgnored="false" %>
- <html>
- <head>
- <title>Create User</title>
- </head>
- <body>
- <div style="padding-left:50px;font-family:monospace;">
- CRUD Operations</br></br>
- <a href="${pageContext.request.contextPath}/create.jsp"><div
- style="color:saffron">Create User</div></a></br></br>
- <a href="${pageContext.request.contextPath}/rest/userInfo"><div
- style="color:saffron">Get User details</div></a></br></br>
- <a href="${pageContext.request.contextPath}/update.jsp"><div
- style="color:saffron">Update User</div></a></br></br>
- <a href="${pageContext.request.contextPath}/delete.jsp"><div
- style="color:saffron">Delete User</div></a></br></br>
- </div>
- </body>
- </html>
<!DOCTYPE html>
<%@ page isELIgnored="false" %>
<html>
<head>
<title>Create User</title>
</head>
<body>
	<div style="padding-left:50px;font-family:monospace;">
			CRUD Operations</br></br>
		<a href="${pageContext.request.contextPath}/create.jsp"><div
                                style="color:saffron">Create User</div></a></br></br>
		<a href="${pageContext.request.contextPath}/rest/userInfo"><div
                                style="color:saffron">Get User details</div></a></br></br>
		<a href="${pageContext.request.contextPath}/update.jsp"><div
                                style="color:saffron">Update User</div></a></br></br>
		<a href="${pageContext.request.contextPath}/delete.jsp"><div
                                style="color:saffron">Delete User</div></a></br></br>
	</div>
</body>
</html>
This page contains the hyperlinks to perform various CRUD operations.
Step 5
Create the JSP page for creating a new user(POST method)
Create.jsp
- <!DOCTYPE html>
- <html>
- <head>
- <title>Create User</title>
- </head>
- <body>
- <div style="padding-left:50px;font-family:monospace;">
- <h2>Create User</h2>
- <form action="rest/userInfo" method="POST">
- <div style="width: 100px; text-align:left;">
- <div style="padding:15px;">
- User ID: <input name="id" />
- </div>
- <div style="padding:10px;">
- Name: <input name="name" />
- </div>
- <div style="padding:10px;">
- Age: <input name="age" />
- </div>
- <div style="padding:20px;text-align:center">
- <input type="submit" value="Submit" />
- </div>
- </div>
- </form>
- </div>
- </body>
- </html>
<!DOCTYPE html>
<html>
<head>
<title>Create User</title>
</head>
<body>
	<div style="padding-left:50px;font-family:monospace;">
		<h2>Create User</h2>
		<form action="rest/userInfo" method="POST">
			<div style="width: 100px; text-align:left;">
				<div style="padding:15px;">
					User ID: <input name="id" />
				</div>
				<div style="padding:10px;">
					Name: <input name="name" />
				</div>
				<div style="padding:10px;">
					Age: <input name="age" />
				</div>
				<div style="padding:20px;text-align:center">
					<input type="submit" value="Submit" />
				</div>
			</div>
		</form>
	</div>
</body>
</html>
Step 6
Create the JSP page for updating the user(PUT method)
update.jsp
- <!DOCTYPE html>
- <html>
- <script src="http://ajax.googleapis.com/ajax/libs/jquery/1.7.1/jquery.min.js" type="text/javascript"></script>
- <script src="js/rest.js"></script>
- <%@ page contentType="text/html; charset=UTF-8" %>
- <head>
- <title>Update User</title>
- </head>
- <body>
- <div style="padding-left:50px;font-family:monospace;">
- <h2>Update User</h2>
- <form id="updateForm">
- <div style="width: 100px; text-align:left;">
- <div style="padding:15px;">
- User ID: <input name="id" />
- </div>
- <div style="padding:10px;">
- Name: <input name="name" />
- </div>
- <div style="padding:10px;">
- Age: <input name="age" />
- </div>
- <div style="padding:20px;text-align:center">
- <input type="submit" value="Submit" />
- </div>
- </div>
- </form>
- </div>
- </body>
- </html>
<!DOCTYPE html>
<html>
<script src="http://ajax.googleapis.com/ajax/libs/jquery/1.7.1/jquery.min.js" type="text/javascript"></script>
<script src="js/rest.js"></script>
<%@ page contentType="text/html; charset=UTF-8" %>
<head>
<title>Update User</title>
</head>
<body>
	<div style="padding-left:50px;font-family:monospace;">
		<h2>Update User</h2>
		<form id="updateForm">
			<div style="width: 100px; text-align:left;">
				<div style="padding:15px;">
					User ID: <input name="id" />
				</div>
				<div style="padding:10px;">
					Name: <input name="name" />
				</div>
				<div style="padding:10px;">
					Age: <input name="age" />
				</div>
				<div style="padding:20px;text-align:center">
					<input type="submit" value="Submit" />
				</div>
			</div>
		</form>
	</div>
</body>
</html>
Step 7
Create the JSP page for Deleting the user(DELETE method)
delete.jsp
- <!DOCTYPE html>
- <html>
- <script src="http://ajax.googleapis.com/ajax/libs/jquery/1.7.1/jquery.min.js" type="text/javascript"></script>
- <script src="js/rest.js"></script>
- <%@ page contentType="text/html; charset=UTF-8" %>
- <head>
- <title>Delete User</title>
- </head>
- <body>
- <div style="padding-left:50px;font-family:monospace;">
- <h2>Delete User</h2>
- <form id="deleteForm">
- <div style="width: 100px; text-align:left;">
- <div style="padding:15px;">
- User ID: <input name="id" />
- </div>
- <div style="padding:20px;text-align:center">
- <input type="submit" value="Submit" />
- </div>
- </div>
- </form>
- </div>
- </body>
- </html>
<!DOCTYPE html>
<html>
<script src="http://ajax.googleapis.com/ajax/libs/jquery/1.7.1/jquery.min.js" type="text/javascript"></script>
<script src="js/rest.js"></script>
<%@ page contentType="text/html; charset=UTF-8" %>
<head>
<title>Delete User</title>
</head>
<body>
	<div style="padding-left:50px;font-family:monospace;">
		<h2>Delete User</h2>
		<form id="deleteForm">
			<div style="width: 100px; text-align:left;">
				<div style="padding:15px;">
					User ID: <input name="id" />
				</div>
				<div style="padding:20px;text-align:center">
					<input type="submit" value="Submit" />
				</div>
			</div>
		</form>
	</div>
</body>
</html>
Step 8
Create the java script file to perform ajax operation on PUT and DELETE operations.
Note
rest.js
- $(document).ready(function () {
- $("#updateForm").on("submit", function(){
- $.ajax({
- url: 'rest/userInfo',
- type: 'PUT',
- dataType: "xml",
- data:$("#updateForm").serialize(),
- success: function(xml) {
- console.log(xml);
- var user="";
- $(xml).find('User').each(function(){
- $(this).find("id").each(function(){
- var id = $(this).text();
- console.log(id);
- user=user+"ID: "+id;
- });
- $(this).find("name").each(function(){
- var name = $(this).text();
- console.log(name);
- user=user+" Name: "+name;
- });
- $(this).find("age").each(function(){
- var age = $(this).text();
- console.log(age);
- user=user+" Age: "+age;
- });
- });
- alert(user);
- }
- });
- return true;
- })
- $("#deleteForm").on("submit", function(){
- $.ajax({
- url: 'rest/userInfo',
- type: 'DELETE',
- dataType: "xml",
- data:$("#deleteForm").serialize(),
- success: function(xml) {
- console.log(xml);
- $(xml).find('User').each(function(){
- $(this).find("id").each(function(){
- var id = $(this).text();
- console.log(id);
- alert("Deleted the user with id "+id);
- });
- });
- }
- });
- return true;
- })
- });
$(document).ready(function () {

$("#updateForm").on("submit", function(){

	$.ajax({
	    url: 'rest/userInfo',
	    type: 'PUT',
	    dataType: "xml",
	    data:$("#updateForm").serialize(),
	    success: function(xml) {
	    	console.log(xml);
	    	var user="";
	    	$(xml).find('User').each(function(){
                $(this).find("id").each(function(){
                    var id = $(this).text();
                    console.log(id);
                    user=user+"ID: "+id;
                });
                $(this).find("name").each(function(){
                    var name = $(this).text();
                    console.log(name);
                    user=user+" Name: "+name;
                });
                $(this).find("age").each(function(){
                    var age = $(this).text();
                    console.log(age);
                    user=user+" Age: "+age;
                });
            });
	    	alert(user);
	    }
	});
   return true;
 })

 $("#deleteForm").on("submit", function(){
	$.ajax({
	    url: 'rest/userInfo',
	    type: 'DELETE',
	    dataType: "xml",
	    data:$("#deleteForm").serialize(),
	    success: function(xml) {
	    	console.log(xml);
	    	$(xml).find('User').each(function(){
                $(this).find("id").each(function(){
                    var id = $(this).text();
                    console.log(id);
                    alert("Deleted the user with id "+id);
                });
            });

	    }
	});
   return true;
 })
});
In this file, we are making PUT and Delete calls on respective form submission and showing the response using console log and alert.
Step 9
Create the resource mapping class which will have the URL mapping methods
- package com.kb.rest.resource;
- import java.util.List;
- import javax.ws.rs.Consumes;
- import javax.ws.rs.DELETE;
- import javax.ws.rs.FormParam;
- import javax.ws.rs.GET;
- import javax.ws.rs.POST;
- import javax.ws.rs.PUT;
- import javax.ws.rs.Path;
- import javax.ws.rs.Produces;
- import javax.ws.rs.core.MediaType;
- import com.kb.model.User;
- import com.kb.service.UserService;
- @Path("/userInfo")
- public class UserResource {
- UserService userService = new UserService();
- // CRUD -- CREATE operation
- @POST
- @Produces(MediaType.TEXT_XML)
- @Consumes(MediaType.APPLICATION_FORM_URLENCODED)
- public User createUser(@FormParam("id") String id,@FormParam("name") String
- name,@FormParam("age") int age)
- {
- User user = new User();
- user.setId(id);
- user.setName(name);
- user.setAge(age);
- User userResponse = userService.createUser(user);
- return userResponse;
- }
- // CRUD -- READ operation
- @GET
- @Produces(MediaType.APPLICATION_XML)
- public List<User> getAllUsers() {
- List<User> userList = userService.getAllUsers();
- return userList;
- }
- // CRUD -- UPDATE operation
- @PUT
- @Produces(MediaType.TEXT_XML)
- @Consumes(MediaType.APPLICATION_FORM_URLENCODED)
- public User updateUser(@FormParam("id") String id,@FormParam("name") String
- name,@FormParam("age") int age)
- {
- User user = userService.getUserForId(id);
- user.setName(name);
- user.setAge(age);
- User userResponse = userService.updateUser(user);
- return userResponse;
- }
- // CRUD -- DELETE operation
- @DELETE
- @Produces(MediaType.TEXT_XML)
- @Consumes(MediaType.APPLICATION_FORM_URLENCODED)
- public User deleteeUser(@FormParam("id") String id) {
- User userResponse = userService.deleteUser(id);
- return userResponse;
- }
- }
package com.kb.rest.resource;

import java.util.List;

import javax.ws.rs.Consumes;
import javax.ws.rs.DELETE;
import javax.ws.rs.FormParam;
import javax.ws.rs.GET;
import javax.ws.rs.POST;
import javax.ws.rs.PUT;
import javax.ws.rs.Path;
import javax.ws.rs.Produces;
import javax.ws.rs.core.MediaType;

import com.kb.model.User;
import com.kb.service.UserService;

@Path("/userInfo")
public class UserResource {
	UserService userService = new UserService();

	// CRUD -- CREATE operation
	@POST
	@Produces(MediaType.TEXT_XML)
	@Consumes(MediaType.APPLICATION_FORM_URLENCODED)
	public User createUser(@FormParam("id") String id,@FormParam("name") String
                                                          name,@FormParam("age") int age)
        {
		User user = new User();
		user.setId(id);
		user.setName(name);
		user.setAge(age);
		User userResponse = userService.createUser(user);
		return userResponse;
	}

	// CRUD -- READ operation
	@GET
	@Produces(MediaType.APPLICATION_XML)
	public List<User> getAllUsers() {
		List<User> userList = userService.getAllUsers();
		return userList;
	}


	// CRUD -- UPDATE operation
	@PUT
	@Produces(MediaType.TEXT_XML)
	@Consumes(MediaType.APPLICATION_FORM_URLENCODED)
	public User updateUser(@FormParam("id") String id,@FormParam("name") String
                                                         name,@FormParam("age") int age)
       {
		User user = userService.getUserForId(id);
		user.setName(name);
		user.setAge(age);
		User userResponse = userService.updateUser(user);
		return userResponse;
	}

	// CRUD -- DELETE operation
	@DELETE
	@Produces(MediaType.TEXT_XML)
	@Consumes(MediaType.APPLICATION_FORM_URLENCODED)
	public User deleteeUser(@FormParam("id") String id) {
		User userResponse = userService.deleteUser(id);
		return userResponse;
	}
}
We have created the Rest service class above which will handle GET,POST,PUT and DELETE operations
@Path(“/userInfo”)
This annotation helps to map the request URL to the appropriate Rest service.
So any request with /userInfo (relative to the base URL) will be mapped to UserResource.
@POST
This annotation specifies that only POST requests will be accepted by this method.
@GET
This annotation specifies that only GET requests will be accepted by this method
@PUT
This annotation specifies that only PUT requests will be accepted by this method
@DELETE
This annotation specifies that only DELETE requests will be accepted by this method.
@Produces(MediaType.APPLICATION_XML)
This annotation is used to specify the representation of a data (MIME type) that the service can produce and send it to client.
This annotation can be used either at the class level or at the method level.
If this annotation is applied at the class level,all the methods in the class can produce the same MIME type data by default.
However we can override this at the method level with different MIME type.
We can also specify multiple MIME types as below@Produces({“application/xml”, “application/json”})
@Consumes(MediaType.APPLICATION_XML)
This annotation is used to specify the representation of a data (MIME type) that the service can accept from the client.
This annotation can be used either at the class level or at the method level.
If this annotation is applied at the class level,all the methods in the class will accept the same MIME type data from client by default.
However we can override this at the method level with different MIME type.
We can also specify multiple MIME types as below@Consumes({“application/xml”, “application/json”})
Note:
We should Use application/xml for the xml to be processed by programs and we should use text/xml if we are using xml for human reading purposes.
Step 10
Create the business service class
- package com.kb.service;
- import java.util.List;
- import com.kb.dao.UserDAO;
- import com.kb.model.User;
- public class UserService {
- UserDAO userDao = new UserDAO();
- public List<User> getAllUsers() {
- List<User> userList = userDao.getAllUsers();
- return userList;
- }
- public User getUserForId(String id) {
- User user = userDao.getUserForId(id);
- return user;
- }
- public User createUser(User user) {
- User userResponse = userDao.createUser(user);
- return userResponse;
- }
- public User updateUser(User user) {
- User userResponse = userDao.updateUser(user);
- return userResponse;
- }
- public User deleteUser(String id) {
- User userResponse = userDao.deleteUser(id);
- return userResponse;
- }
- }
package com.kb.service;

import java.util.List;

import com.kb.dao.UserDAO;
import com.kb.model.User;

public class UserService {
	UserDAO userDao = new UserDAO();

	public List<User> getAllUsers() {
		List<User> userList = userDao.getAllUsers();
		return userList;
	}

	public User getUserForId(String id) {
		User user = userDao.getUserForId(id);
		return user;
	}

	public User createUser(User user) {
		User userResponse = userDao.createUser(user);
		return userResponse;
	}

	public User updateUser(User user) {
		User userResponse = userDao.updateUser(user);
		return userResponse;
	}

	public User deleteUser(String id) {
		User userResponse = userDao.deleteUser(id);
		return userResponse;
	}

}
We have defined 5 methods in the above class
getAllUsers() – This method is used to get all the users, helps to serve GET request
getUserForId(String id) – This method is used to get the user details for a specific user,helps to serve the GET request for a specific user
createUser(User user) – This method is used to insert the new user details,helps to serve the POST request
updateUser(User user) – This method is used to update the user details,helps to serve the PUT request
deleteUser(String id) – This method is used to delete the user details,helps to serve the DELETE request
Step 11
Create the DAO class
- package com.kb.dao;
- import java.util.ArrayList;
- import java.util.HashMap;
- import java.util.List;
- import com.kb.model.User;
- //Just to avoid DB calls in this example, Assume below data is interacting with DB
- public class UserDAO {
- static HashMap<String, User> usersMap = new HashMap<String, User>();
- public UserDAO() {
- User user1 = new User();
- user1.setId("1");
- user1.setAge(20);
- user1.setName("raj");
- User user2 = new User();
- user2.setId("2");
- user2.setAge(21);
- user2.setName("ram");
- usersMap.put("1", user1);
- usersMap.put("2", user2);
- }
- public List<User> getAllUsers() {
- List<User> userList = new ArrayList<User>(usersMap.values());
- return userList;
- }
- public User getUserForId(String id) {
- User user = usersMap.get(id);
- return user;
- }
- public User createUser(User user) {
- usersMap.put(user.getId(), user);
- return usersMap.get(user.getId());
- }
- public User updateUser(User user) {
- User existingUser= usersMap.get(user.getId());
- if (existingUser != null) {
- existingUser.setName(user.getName());
- existingUser.setAge(user.getAge());
- } else {
- usersMap.put(user.getId(), user);
- }
- return usersMap.get(user.getId());
- }
- public User deleteUser(String id) {
- User userResponse = usersMap.remove(id);
- return userResponse;
- }
- }
package com.kb.dao;

import java.util.ArrayList;
import java.util.HashMap;
import java.util.List;

import com.kb.model.User;

//Just to avoid DB calls in this example, Assume below data is interacting with DB
public class UserDAO {
	static HashMap<String, User> usersMap = new HashMap<String, User>();

	public UserDAO() {
			User user1 = new User();
			user1.setId("1");
			user1.setAge(20);
			user1.setName("raj");

			User user2 = new User();
			user2.setId("2");
			user2.setAge(21);
			user2.setName("ram");

			usersMap.put("1", user1);
			usersMap.put("2", user2);
	}

	public List<User> getAllUsers() {

		List<User> userList = new ArrayList<User>(usersMap.values());
		return userList;
	}

	public User getUserForId(String id) {
		User user = usersMap.get(id);
		return user;
	}

	public User createUser(User user) {
		usersMap.put(user.getId(), user);
		return usersMap.get(user.getId());
	}

	public User updateUser(User user) {
		User existingUser= usersMap.get(user.getId());
		if (existingUser != null) {
			existingUser.setName(user.getName());
			existingUser.setAge(user.getAge());
		} else {
			usersMap.put(user.getId(), user);
		}
		return usersMap.get(user.getId());
	}

	public User deleteUser(String id) {
		User userResponse = usersMap.remove(id);
		return userResponse;
	}
   }
We have created DAO class to support all the CRUD operations
We have used a usersMap to store user details(just to avoid DB interaction)
In the constructor , we have added 2 user details in the userMap.
and all the other methods will use this userMap to read,insert,update and delete the user details.
Step 12
Build and deploy the project
Step 13
Let’s see the output of all CRUD operations
Access below url
http://localhost:8080/CRUDWithRestAndJSP/
POST
Click on create user link

Fill the details and submit
We can see that data is created and we can see the same in the output
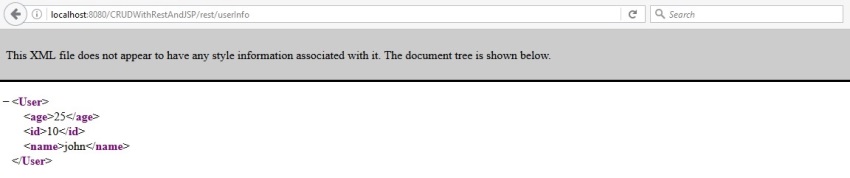
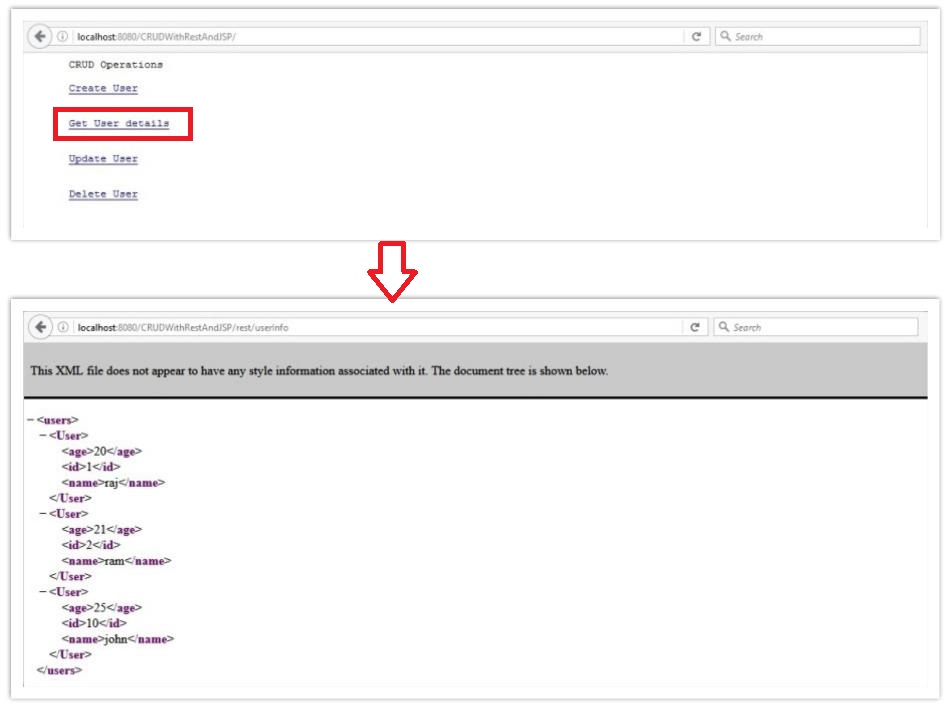
GET
Click on “Get User Details” link
PUT
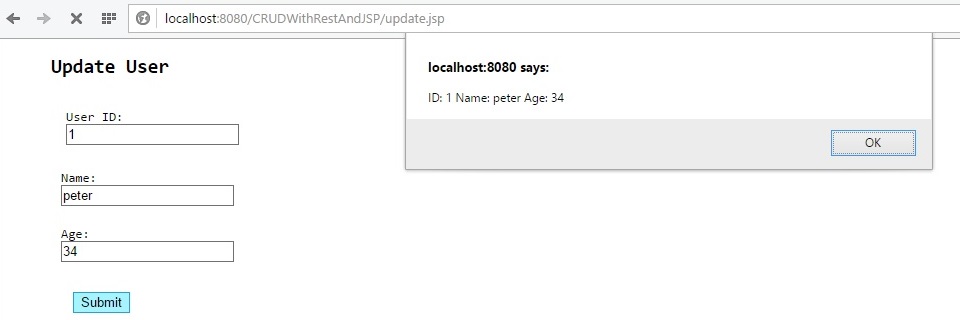
Click on Update user link
Fill the details and submit
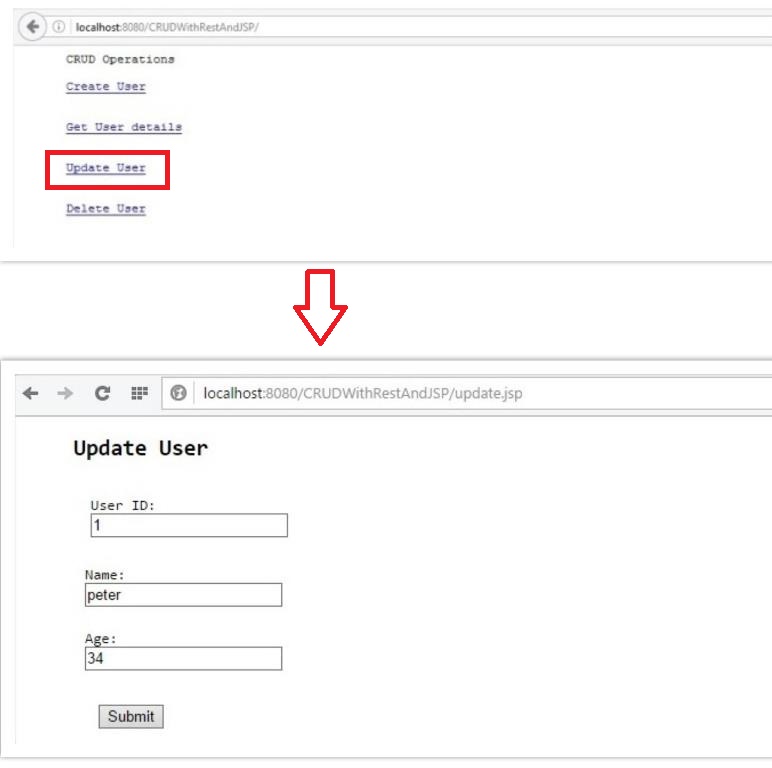
We can see that data is updated and we can see the same in the output.
DELETE
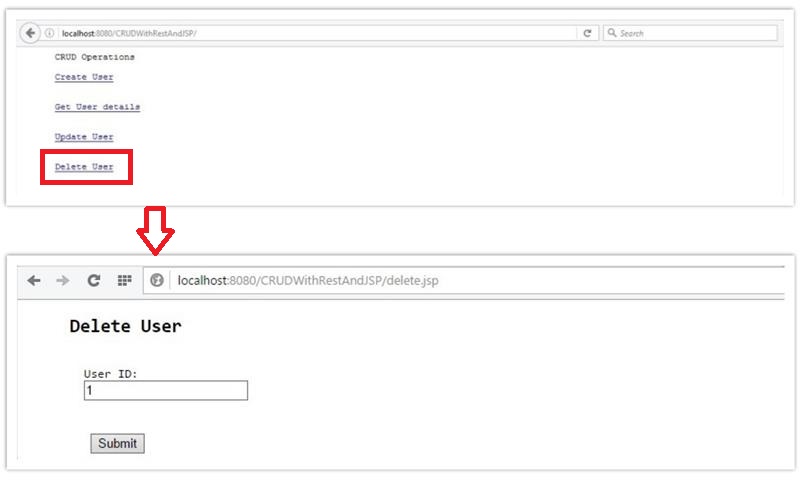
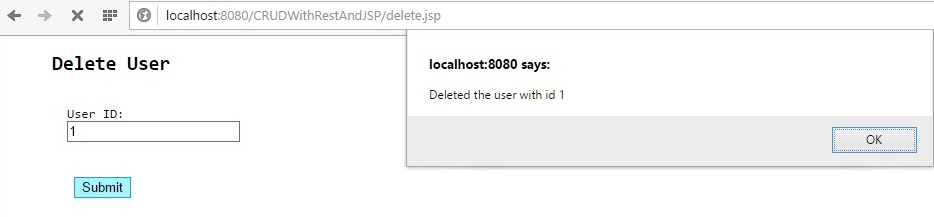
Click on Delete user link
Fill the details and submit
We can see that data is deleted and we can see the same in the output

Hi..
In the example above, on click of Get User details link, how does it calls /uersInfo GET method?
// CRUD — READ operation
@GET
@Produces(MediaType.APPLICATION_XML)
public List getAllUsers() {
List userList = userService.getAllUsers();
return userList;
}
We have not mentioned the request type to be ‘GET’ anywhere as we did in other request type like and
$.ajax({
url: ‘rest/userInfo’,
type: ‘PUT’,
dataType: “xml”,
data:$(“#updateForm”).serialize(),
and
$.ajax({
url: ‘rest/userInfo’,
type: ‘DELETE’,
dataType: “xml”,
data:$(“#deleteForm”).serialize(),
Thanks
Good example. Where should i download from. Thanks
There is a download link at the end of this article
Please provide project structure picture as well. I am not getting whether i should create all jsp inside webapp or src/main/resources.
I downloaded the project & found my ans. Thanks!!