Rest service Hello World with RestEasy
Tools and Technologies used
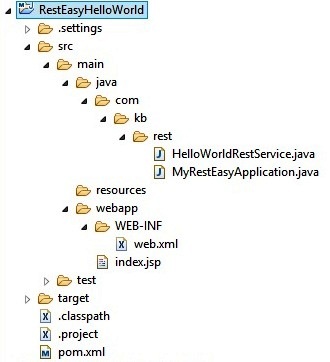
Project structure
Step 1
Create a new Maven project with name “RestEasyHelloWold” in eclipse.
Refer Step 1 in this article for the same.
Step 2
Add the RestEasy server dependency to pom.xml
- <project xmlns="http://maven.apache.org/POM/4.0.0"
- xmlns:xsi="http://www.w3.org/2001/XMLSchema-instance"
- xsi:schemaLocation="http://maven.apache.org/POM/4.0.0
- http://maven.apache.org/maven-v4_0_0.xsd">
- <modelVersion>4.0.0</modelVersion>
- <groupId>RestEasyHelloWorld</groupId>
- <artifactId>RestEasyHelloWorld</artifactId>
- <packaging>war</packaging>
- <version>0.0.1-SNAPSHOT</version>
- <name>RestEasyHelloWorld Maven Webapp</name>
- <url>http://maven.apache.org</url>
- <dependencies>
- <dependency>
- <groupId>junit</groupId>
- <artifactId>junit</artifactId>
- <version>3.8.1</version>
- <scope>test</scope>
- </dependency>
- <!-- https://mvnrepository.com/artifact/org.jboss.resteasy/resteasy-jaxrs -->
- <dependency>
- <groupId>org.jboss.resteasy</groupId>
- <artifactId>resteasy-jaxrs</artifactId>
- <version>3.0.4.Final</version>
- </dependency>
- </dependencies>
- <build>
- <finalName>RestEasyHelloWorld</finalName>
- </build>
- </project>
<project xmlns="http://maven.apache.org/POM/4.0.0"
         xmlns:xsi="http://www.w3.org/2001/XMLSchema-instance"
         xsi:schemaLocation="http://maven.apache.org/POM/4.0.0
         http://maven.apache.org/maven-v4_0_0.xsd">
  <modelVersion>4.0.0</modelVersion>
  <groupId>RestEasyHelloWorld</groupId>
  <artifactId>RestEasyHelloWorld</artifactId>
  <packaging>war</packaging>
  <version>0.0.1-SNAPSHOT</version>
  <name>RestEasyHelloWorld Maven Webapp</name>
  <url>http://maven.apache.org</url>
  <dependencies>
       <dependency>
             <groupId>junit</groupId>
             <artifactId>junit</artifactId>
             <version>3.8.1</version>
             <scope>test</scope>
       </dependency>

                    <!-- https://mvnrepository.com/artifact/org.jboss.resteasy/resteasy-jaxrs -->
       <dependency>
             <groupId>org.jboss.resteasy</groupId>
             <artifactId>resteasy-jaxrs</artifactId>
             <version>3.0.4.Final</version>
       </dependency>

    </dependencies>

 <build>
    <finalName>RestEasyHelloWorld</finalName>
  </build>

</project>
We have added the RestEasy dependency in the above pom file.
Step 3
Update web.xml file with RestEasy servlet container
- <!DOCTYPE web-app PUBLIC "-//Sun Microsystems, Inc.//DTD Web Application 2.3//EN"
- "http://java.sun.com/dtd/web-app_2_3.dtd" >
- <web-app>
- <display-name>Archetype Created Web Application</display-name>
- <context-param>
- <param-name>resteasy.scan</param-name>
- <param-value>true</param-value>
- </context-param>
- <context-param>
- <param-name>resteasy.servlet.mapping.prefix</param-name>
- <param-value>/rest</param-value>
- </context-param>
- <listener>
- <listener-class>
- org.jboss.resteasy.plugins.server.servlet.ResteasyBootstrap
- </listener-class>
- </listener>
- <servlet>
- <servlet-name>Resteasy</servlet-name>
- <servlet-class>
- org.jboss.resteasy.plugins.server.servlet.HttpServletDispatcher
- </servlet-class>
- </servlet>
- <servlet-mapping>
- <servlet-name>Resteasy</servlet-name>
- <url-pattern>/rest/*</url-pattern>
- </servlet-mapping>
- </web-app>
<!DOCTYPE web-app PUBLIC "-//Sun Microsystems, Inc.//DTD Web Application 2.3//EN"
                         "http://java.sun.com/dtd/web-app_2_3.dtd" >

<web-app>
     <display-name>Archetype Created Web Application</display-name>
        <context-param>
              <param-name>resteasy.scan</param-name>
              <param-value>true</param-value>
        </context-param>

        <context-param>
	      <param-name>resteasy.servlet.mapping.prefix</param-name>
	      <param-value>/rest</param-value>
	</context-param>

     <listener>
        <listener-class>
               org.jboss.resteasy.plugins.server.servlet.ResteasyBootstrap
        </listener-class>
     </listener>

    <servlet>
        <servlet-name>Resteasy</servlet-name>
        <servlet-class>
            org.jboss.resteasy.plugins.server.servlet.HttpServletDispatcher
        </servlet-class>
    </servlet>

    <servlet-mapping>
        <servlet-name>Resteasy</servlet-name>
        <url-pattern>/rest/*</url-pattern>
    </servlet-mapping>

</web-app>
We have defined a RestEasy servlet with the class name org.jboss.resteasy.plugins.server.servlet.HttpServletDispatcher
which will act as a Resteasy container.
ResteasyBootstrap is used to scan the Rest classes annotated with JAX-RS annotations.
It uses the values from the context-param elements.
resteasy.servlet.mapping.prefix : In this parameter we define the URI prefix for our Rest Service.
This should be same as servlet-mapping value.
This value should be prefixed with URL to invoke the RestEasy resources.
resteasy.scan : If this value is set to true,ResteasyBootstrap will automatically search for REST Services Implementation classes annotated with JAX-RS annotations (@Path, @GET, @POST etc…) and register them as a Rest service classes.
Step 4
Create a Hello world Rest service
- package com.kb.rest;
- import javax.ws.rs.GET;
- import javax.ws.rs.Path;
- import javax.ws.rs.Produces;
- import javax.ws.rs.core.MediaType;
- @Path("/hello")
- public class HelloWorldRestService {
- @GET
- @Produces(MediaType.TEXT_PLAIN)
- public String getMessage(){
- return "RestEasy Hello World";
- }
- }
package com.kb.rest;

import javax.ws.rs.GET;
import javax.ws.rs.Path;
import javax.ws.rs.Produces;
import javax.ws.rs.core.MediaType;

@Path("/hello")
public class HelloWorldRestService {

	@GET
	@Produces(MediaType.TEXT_PLAIN)
	public String getMessage(){
		return "RestEasy Hello World";

	}
}
@Path – to specify the root path of the resource which is “/hello”
@GET – It’s the HTTP method that is supported by the service
@Produces – It’s used to specify the MIME type that service is supporting which is Plain Text here.
Step 5
Build the project and deploy the project in the Tomcat server
Step 6
Start the server
Step 7
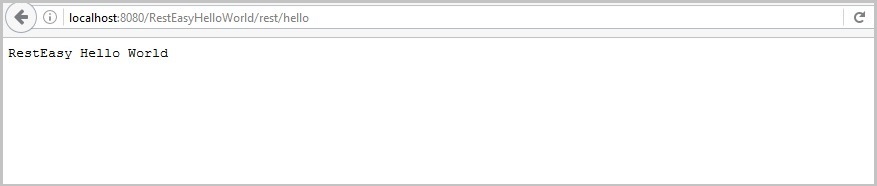
Access the Rest service using below URL
http://localhost:8080/RestEasyHelloWorld/rest/hello
Alternative way of Implementing Rest service using RestEasy
We can also achieve Rest service implementation by defining our application class by extending javax.ws.rs.core.Application.
In this case, we don’t need to provide resteasy.scan to scan the Rest services rather we just need to make an entry of our Application class in the web.xml
MyRestEasyApplication.java
- package com.kb.rest;
- import java.util.HashSet;
- import java.util.Set;
- import javax.ws.rs.core.Application;
- public class MyRestEasyApplication extends Application {
- private Set<Object> singletons = new HashSet<Object>();
- public MyRestEasyApplication() {
- singletons.add(new HelloWorldRestService());
- }
- @Override
- public Set<Object> getSingletons() {
- return singletons;
- }
- }
package com.kb.rest;

import java.util.HashSet;
import java.util.Set;

import javax.ws.rs.core.Application;

public class MyRestEasyApplication extends Application {

	private Set<Object> singletons = new HashSet<Object>();

	public MyRestEasyApplication() {
		singletons.add(new HelloWorldRestService());
	}

	@Override
	public Set<Object> getSingletons() {
		return singletons;
	}

}
In this class, we just need to add all our Rest service classes to singletons HashSet as shown above.
This will be used by the RestEasy framework to identify the appropriate Resource based on request URL.
Web.xml
- <!DOCTYPE web-app PUBLIC "-//Sun Microsystems, Inc.//DTD Web Application 2.3//EN"
- "http://java.sun.com/dtd/web-app_2_3.dtd" >
- <web-app>
- <display-name>Archetype Created Web Application</display-name>
- <!-- <context-param>
- <param-name>resteasy.scan</param-name>
- <param-value>true</param-value>
- </context-param> -->
- <context-param>
- <param-name>resteasy.servlet.mapping.prefix</param-name>
- <param-value>/rest</param-value>
- </context-param>
- <listener>
- <listener-class>
- org.jboss.resteasy.plugins.server.servlet.ResteasyBootstrap
- </listener-class>
- </listener>
- <servlet>
- <servlet-name>Resteasy</servlet-name>
- <servlet-class>
- org.jboss.resteasy.plugins.server.servlet.HttpServletDispatcher
- </servlet-class>
- <init-param>
- <param-name>javax.ws.rs.Application</param-name>
- <param-value>com.kb.rest.MyRestEasyApplication</param-value>
- </init-param>
- </servlet>
- <servlet-mapping>
- <servlet-name>Resteasy</servlet-name>
- <url-pattern>/rest/*</url-pattern>
- </servlet-mapping>
- </web-app>
<!DOCTYPE web-app PUBLIC  "-//Sun Microsystems, Inc.//DTD Web Application 2.3//EN"
                          "http://java.sun.com/dtd/web-app_2_3.dtd" >

<web-app>
  <display-name>Archetype Created Web Application</display-name>
  <!--  <context-param>
        <param-name>resteasy.scan</param-name>
        <param-value>true</param-value>
    </context-param> -->
    <context-param>
		<param-name>resteasy.servlet.mapping.prefix</param-name>
		<param-value>/rest</param-value>
	</context-param>
    <listener>
        <listener-class>
       org.jboss.resteasy.plugins.server.servlet.ResteasyBootstrap
        </listener-class>
    </listener>
    <servlet>
        <servlet-name>Resteasy</servlet-name>
        <servlet-class>
            org.jboss.resteasy.plugins.server.servlet.HttpServletDispatcher
        </servlet-class>
        <init-param>
      <param-name>javax.ws.rs.Application</param-name>
      <param-value>com.kb.rest.MyRestEasyApplication</param-value>
    </init-param>
    </servlet>
    <servlet-mapping>
        <servlet-name>Resteasy</servlet-name>
        <url-pattern>/rest/*</url-pattern>
    </servlet-mapping>
</web-app>
We have removed the resteasy.scan context parameter to scan the Resources but we have included our application class in the init-param as below
- <init-param>
- <param-name>javax.ws.rs.Application</param-name>
- <param-value>com.kb.rest.MyRestEasyApplication</param-value>
- </init-param>
<init-param>
      <param-name>javax.ws.rs.Application</param-name>
      <param-value>com.kb.rest.MyRestEasyApplication</param-value>
</init-param>
This will also yield the same output.
