Spring Rest service Hello world with XML
Create a new Maven Web project in eclipse (Refer Spring MVC Hello World project for the same)
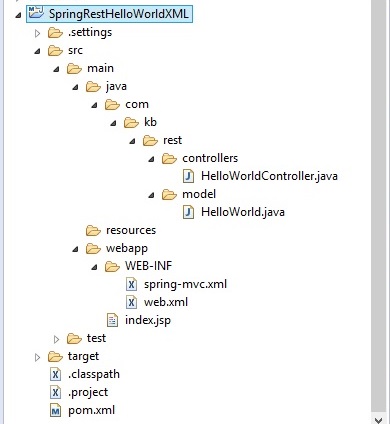
Project structure
Step 1
Update pom.xml with below dependencies
- <project xmlns="http://maven.apache.org/POM/4.0.0" xmlns:xsi="http://www.w3.org/2001/XMLSchema-instance"
- xsi:schemaLocation="http://maven.apache.org/POM/4.0.0 http://maven.apache.org/maven-v4_0_0.xsd">
- <modelVersion>4.0.0</modelVersion>
- <groupId>SpringRestHelloWorldXML</groupId>
- <artifactId>SpringRestHelloWorldXML</artifactId>
- <packaging>war</packaging>
- <version>0.0.1-SNAPSHOT</version>
- <name>SpringRestHelloWorldXML Maven Webapp</name>
- <url>http://maven.apache.org</url>
- <properties>
- <org.springframework.version>4.2.0.RELEASE</org.springframework.version>
- </properties>
- <dependencies>
- <dependency>
- <groupId>junit</groupId>
- <artifactId>junit</artifactId>
- <version>3.8.1</version>
- <scope>test</scope>
- </dependency>
- <dependency>
- <groupId>org.springframework</groupId>
- <artifactId>spring-web</artifactId>
- <version>${org.springframework.version}</version>
- </dependency>
- <dependency>
- <groupId>org.springframework</groupId>
- <artifactId>spring-webmvc</artifactId>
- <version>${org.springframework.version}</version>
- </dependency>
- </dependencies>
- <build>
- <finalName>SpringRestHelloWorldXML</finalName>
- </build>
- </project>
<project xmlns="http://maven.apache.org/POM/4.0.0" xmlns:xsi="http://www.w3.org/2001/XMLSchema-instance"
	xsi:schemaLocation="http://maven.apache.org/POM/4.0.0 http://maven.apache.org/maven-v4_0_0.xsd">
	<modelVersion>4.0.0</modelVersion>
	<groupId>SpringRestHelloWorldXML</groupId>
	<artifactId>SpringRestHelloWorldXML</artifactId>
	<packaging>war</packaging>
	<version>0.0.1-SNAPSHOT</version>
	<name>SpringRestHelloWorldXML Maven Webapp</name>
	<url>http://maven.apache.org</url>
	<properties>
		<org.springframework.version>4.2.0.RELEASE</org.springframework.version>
	</properties>
	<dependencies>
		<dependency>
			<groupId>junit</groupId>
			<artifactId>junit</artifactId>
			<version>3.8.1</version>
			<scope>test</scope>
		</dependency>
		<dependency>
			<groupId>org.springframework</groupId>
			<artifactId>spring-web</artifactId>
			<version>${org.springframework.version}</version>
		</dependency>

		<dependency>
			<groupId>org.springframework</groupId>
			<artifactId>spring-webmvc</artifactId>
			<version>${org.springframework.version}</version>
		</dependency>
	</dependencies>
	<build>
		<finalName>SpringRestHelloWorldXML</finalName>
	</build>
</project>
We have added dependencies for Spring web ,spring web mvc and Junit in the above pom file.
Step 2
Update web.xml file with Dispatcher servlet
we have defined a dispatcher servlet in web.xml and mapped it by the URL pattern “/”
So just like any other servlet in web application,any request matching with the given pattern i.e “/” will be redirected to “Dispatcher servlet”.
- <web-app id="WebApp_ID" version="2.4"
- xmlns="http://java.sun.com/xml/ns/j2ee" xmlns:xsi="http://www.w3.org/2001/XMLSchema-instance"
- xsi:schemaLocation="http://java.sun.com/xml/ns/j2ee
- http://java.sun.com/xml/ns/j2ee/web-app_2_4.xsd">
- <display-name>Archetype Created Web Application</display-name>
- <servlet>
- <servlet-name>mvc-dispatcher</servlet-name>
- <servlet-class>org.springframework.web.servlet.DispatcherServlet</servlet-class>
- <init-param>
- <param-name>contextConfigLocation</param-name>
- <param-value>
- /WEB-INF/spring-mvc.xml
- </param-value>
- </init-param>
- <load-on-startup>1</load-on-startup>
- </servlet>
- <servlet-mapping>
- <servlet-name>mvc-dispatcher</servlet-name>
- <url-pattern>/</url-pattern>
- </servlet-mapping>
- <context-param>
- <param-name>contextConfigLocation</param-name>
- <param-value>/WEB-INF/spring-mvc.xml</param-value>
- </context-param>
- <listener>
- <listener-class>org.springframework.web.context.ContextLoaderListener</listener-class>
- </listener>
- </web-app>
<web-app id="WebApp_ID" version="2.4"
	xmlns="http://java.sun.com/xml/ns/j2ee" xmlns:xsi="http://www.w3.org/2001/XMLSchema-instance"
	xsi:schemaLocation="http://java.sun.com/xml/ns/j2ee
 http://java.sun.com/xml/ns/j2ee/web-app_2_4.xsd">

	<display-name>Archetype Created Web Application</display-name>
	<servlet>
		<servlet-name>mvc-dispatcher</servlet-name>
		<servlet-class>org.springframework.web.servlet.DispatcherServlet</servlet-class>
		<init-param>
			<param-name>contextConfigLocation</param-name>
			<param-value>
            /WEB-INF/spring-mvc.xml
            </param-value>
		</init-param>
		<load-on-startup>1</load-on-startup>
	</servlet>

	<servlet-mapping>
		<servlet-name>mvc-dispatcher</servlet-name>
		<url-pattern>/</url-pattern>
	</servlet-mapping>

	<context-param>
		<param-name>contextConfigLocation</param-name>
		<param-value>/WEB-INF/spring-mvc.xml</param-value>
	</context-param>

	<listener>
		<listener-class>org.springframework.web.context.ContextLoaderListener</listener-class>
	</listener>
</web-app>
We have also provided the spring configuration file name to create and load the spring beans while starting the server.
Step 3
Create a Model class which represents the data with JAXB annotations
- package com.kb.rest.model;
- import javax.xml.bind.annotation.XmlAccessType;
- import javax.xml.bind.annotation.XmlAccessorType;
- import javax.xml.bind.annotation.XmlElement;
- import javax.xml.bind.annotation.XmlRootElement;
- @XmlRootElement
- @XmlAccessorType(XmlAccessType.FIELD)
- public class HelloWorld {
- @XmlElement
- private String message;
- public String getMessage() {
- return message;
- }
- public void setMessage(String message) {
- this.message = message;
- }
- }
package com.kb.rest.model;

import javax.xml.bind.annotation.XmlAccessType;
import javax.xml.bind.annotation.XmlAccessorType;
import javax.xml.bind.annotation.XmlElement;
import javax.xml.bind.annotation.XmlRootElement;

@XmlRootElement
@XmlAccessorType(XmlAccessType.FIELD)
public class HelloWorld {
	@XmlElement
	private String message;

	public String getMessage() {
		return message;
	}

	public void setMessage(String message) {
		this.message = message;
	}

}
We have created a HelloWorld class with message to represent the data
@XmlRootElement – specifies the root tag of each HelloWorld record in xml.
@XmlElement – specifies the child element for each attribute of HelloWorld record.
@XmlAccessorType(XmlAccessType.FIELD) – specifies that fields are considered to be serialized
Step 4
Create the Controller which will have the URL mapping method
- package com.kb.rest.controllers;
- import org.springframework.stereotype.Controller;
- import org.springframework.web.bind.annotation.RequestMapping;
- import org.springframework.web.bind.annotation.ResponseBody;
- import com.kb.rest.model.HelloWorld;
- @Controller
- public class HelloWorldController {
- @RequestMapping("/message")
- public @ResponseBody HelloWorld getMessage(){
- HelloWorld helloWorld = new HelloWorld();
- helloWorld.setMessage("Hello World");
- return helloWorld;
- }
- }
package com.kb.rest.controllers;

import org.springframework.stereotype.Controller;
import org.springframework.web.bind.annotation.RequestMapping;
import org.springframework.web.bind.annotation.ResponseBody;

import com.kb.rest.model.HelloWorld;

@Controller
public class HelloWorldController {
	@RequestMapping("/message")
	public @ResponseBody HelloWorld getMessage(){
		HelloWorld helloWorld = new HelloWorld();
		helloWorld.setMessage("Hello World");
		return helloWorld;
	}

}
We have created the Controller class above which will act as a Rest service in Spring.
How Spring controller acts as a Rest service ?
We have @ResponseBody before the return type of a method in method signature which indicates to Spring that ,the returned value from this method will not be a view rather it has to be read from the response body.
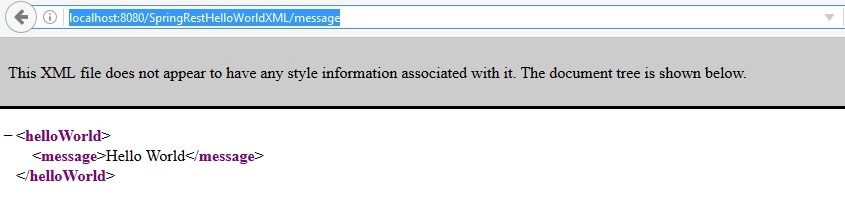
Hence any one can call this method with the appropriate end point as below
http://localhost:8080/SpringRestHelloWorldXML/message
We can also use @RestController directly instead of @Controller, in that case we don’t need to use @ResponseBody in each method.
Note: @RestController is supported in Spring 4 and above
Step 5
Build and deploy the project
Step 6
Let’s see the output
access the below URL
http://localhost:8080/SpringRestHelloWorldXML/message