Hybris B2C Installation
Hybris commerce suite comes with .zip file which contains all the files required to work with Hybris.
Lets see the steps to setup the Hybris
Step 1: Download and Unzip Hybris suite
Download Hybris Zip file from SAP Market place.
Copy it to one of the folder in your local system,I have copied it in E:\practice folder(I will be using this folder for all hybris folder path, please adjust it accordingly in your system)
I am using Hybris 5.6
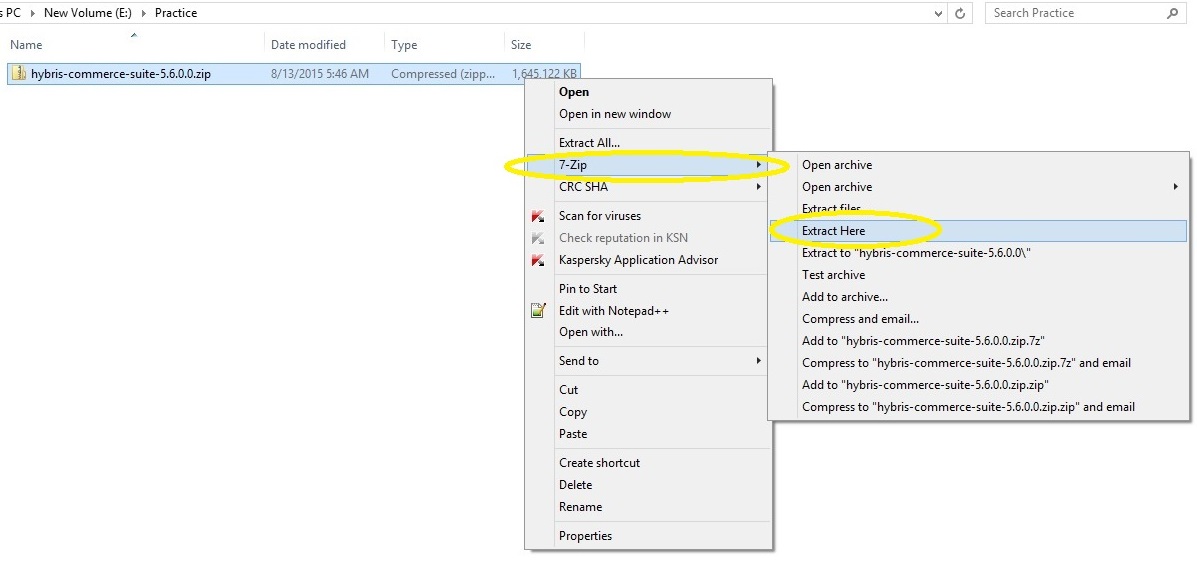
Unzip the zipped file using 7 zip(if you don’t have 7 zip,please download from Here) to the same folder.
Delete the zipped folder of Hybris from this path.
Step 2: Installing Recipe
Recipe concept is available from Hybris 5.5 and later versions.
It is used to install B2C accelerators,B2B accelerators ,Telco accelerators etc
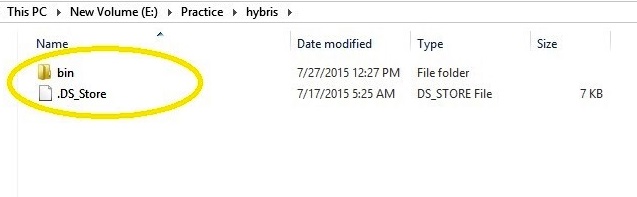
Before installing Recipe, observe that we can find only bin folder inside hybris folder.
Go to installer path in command prompt
E:\practice\installer install.bat –r b2c_acc_plus
(syntax is install.bat –r recipeName)
This command is used to install the recipe

This command will add the required extensions to the localextensions.xml file as per the recipe name we have provided in the command.
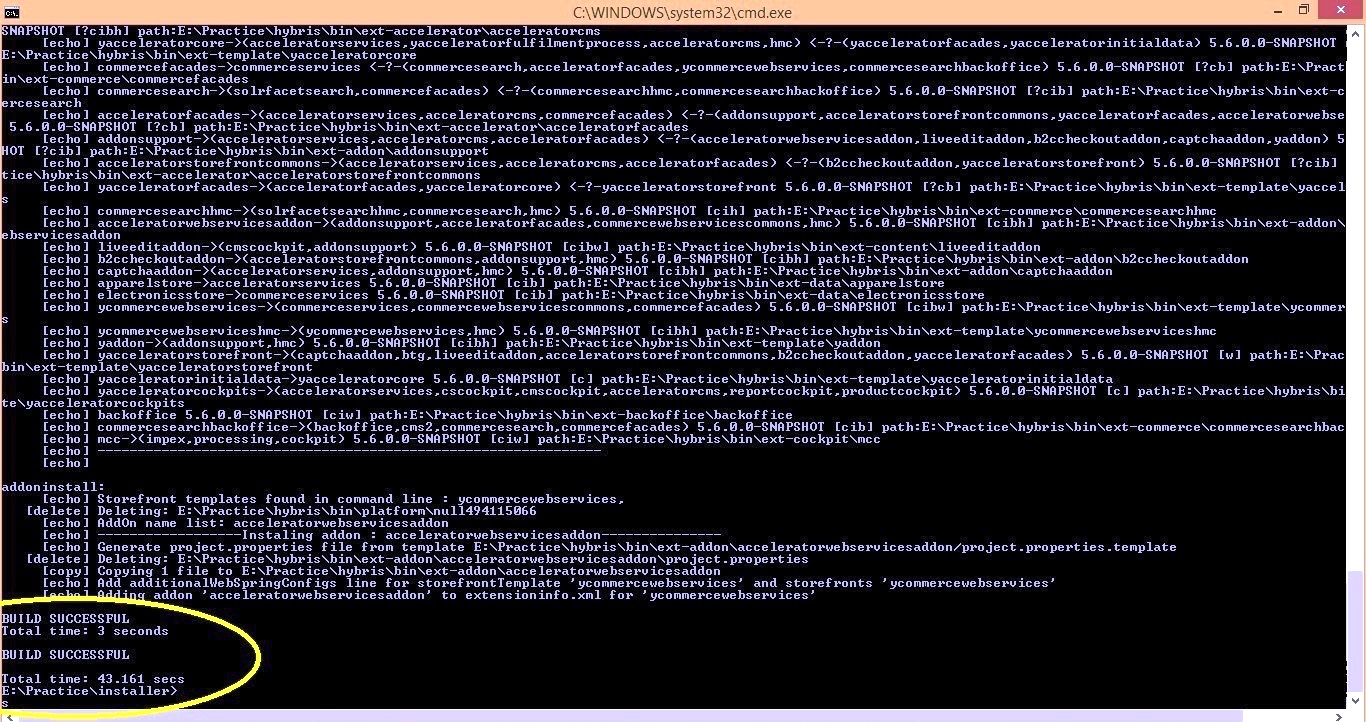
Now we can see that Recipe command ran successfully
Now open the hybris folder and check the folders created

Inside config folder, we can see that localextensions.xml got created with all the extensions specified in the given recipe.
localextensions.xml after installing Recipe looks like below
- <hybrisconfig xmlns:xsi='http://www.w3.org/2001/XMLSchema-instance' xsi:noNamespaceSchemaLocation='../bin/platform/resources/schemas/extensions.xsd'>
- <extensions>
- <path dir='${HYBRIS_BIN_DIR}' autoload='false' />
- <extension name='mcc' />
- <extension name='backoffice' />
- <extension name='commercesearchbackoffice' />
- <extension name='yacceleratorcockpits' />
- <extension name='yacceleratorinitialdata' />
- <extension name='yacceleratorstorefront' />
- <extension name='yaddon' />
- <extension name='ycommercewebservices' />
- <extension name='electronicsstore' />
- <extension name='apparelstore' />
- <extension name='captchaaddon' />
- <extension name='b2ccheckoutaddon' />
- <extension name='liveeditaddon' />
- <extension name='acceleratorwebservicesaddon' />
- </extensions>
- </hybrisconfig>
<hybrisconfig xmlns:xsi='http://www.w3.org/2001/XMLSchema-instance' xsi:noNamespaceSchemaLocation='../bin/platform/resources/schemas/extensions.xsd'>
  <extensions>
    <path dir='${HYBRIS_BIN_DIR}' autoload='false' />
    <extension name='mcc' />
    <extension name='backoffice' />
    <extension name='commercesearchbackoffice' />
    <extension name='yacceleratorcockpits' />
    <extension name='yacceleratorinitialdata' />
    <extension name='yacceleratorstorefront' />
    <extension name='yaddon' />
    <extension name='ycommercewebservices' />
    <extension name='electronicsstore' />
    <extension name='apparelstore' />
    <extension name='captchaaddon' />
    <extension name='b2ccheckoutaddon' />
    <extension name='liveeditaddon' />
    <extension name='acceleratorwebservicesaddon' />
  </extensions>
</hybrisconfig>
We can find all the available recipe in hybris under below directory
E:\practice\installer\recipes
Step 3: Modulegen
Its an Ant command used to generate the set of logically related extensions at once.
Navigate to platform folder in command prompt
Run the below command
setantenv.bat

Now run the modulegen command as below in the same command window
ant modulegen -Dinput.module=accelerator -Dinput.name=training -Dinput.package=com.hybris.training -Dinput.template=develop
we have specified module as accelerator which means we are developing B2C module.
we can specify any name to the module, we have given training for the same.
We can also specify the java class package prefix, we have given as com.hybris.training
Template specifies whether configuration is for development or production.
We have given it as develop as we are doing for development environment.
We should be able to see the Build success in the command prompt as below
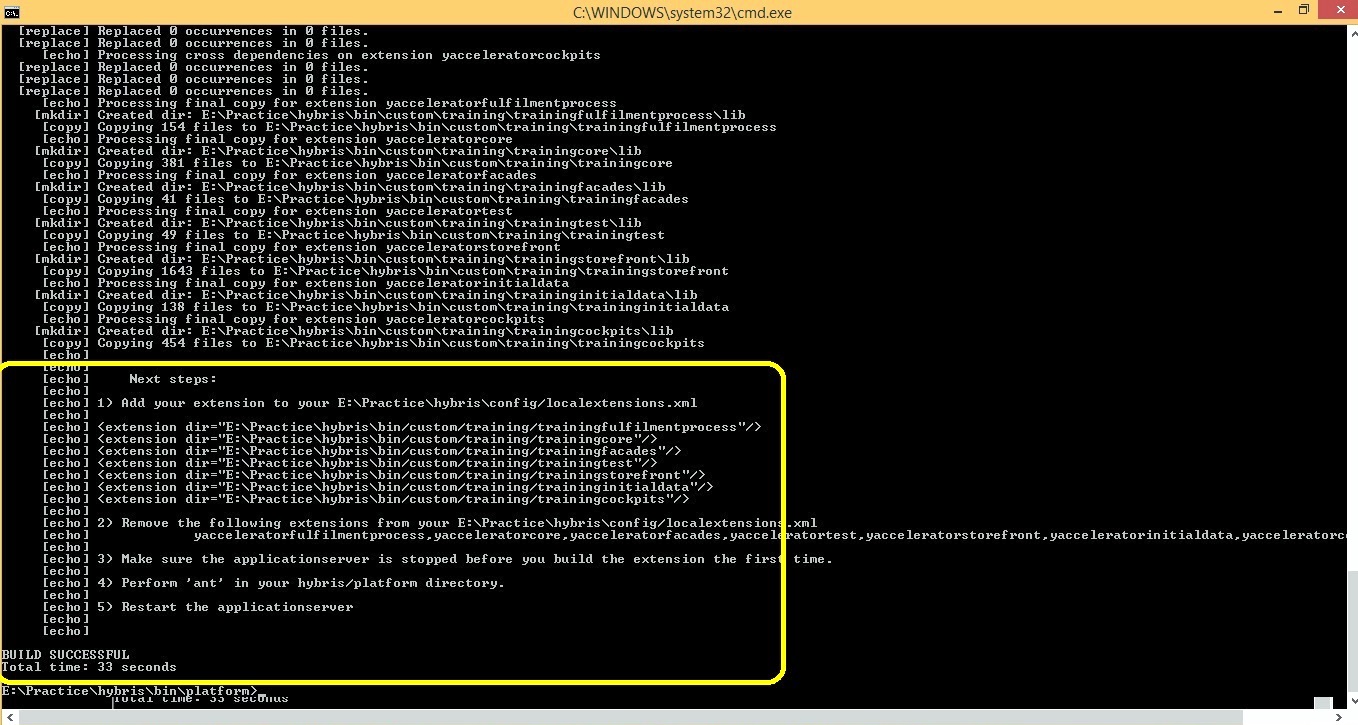
You can see the next steps to be performed in the command prompt
Just do the first 2 steps, and then localextensions.xml should be as below
- <hybrisconfig xmlns:xsi='http://www.w3.org/2001/XMLSchema-instance' xsi:noNamespaceSchemaLocation='../bin/platform/resources/schemas/extensions.xsd'>
- <extensions>
- <path dir='${HYBRIS_BIN_DIR}' autoload='false' />
- <extension name='mcc' />
- <extension name='backoffice' />
- <extension name='commercesearchbackoffice' />
- <extension name='trainingfulfilmentprocess' />
- <extension name='trainingcore' />
- <extension name='trainingfacades' />
- <extension name='trainingtest' />
- <extension name='trainingstorefront' />
- <extension name='traininginitialdata' />
- <extension name='trainingcockpits' />
- <extension name='yaddon' />
- <extension name='ycommercewebservices' />
- <extension name='electronicsstore' />
- <extension name='apparelstore' />
- <extension name='captchaaddon' />
- <extension name='b2ccheckoutaddon' />
- <extension name='liveeditaddon' />
- <extension name='acceleratorwebservicesaddon' />
- </extensions>
- </hybrisconfig>
<hybrisconfig xmlns:xsi='http://www.w3.org/2001/XMLSchema-instance' xsi:noNamespaceSchemaLocation='../bin/platform/resources/schemas/extensions.xsd'>
  <extensions>
    <path dir='${HYBRIS_BIN_DIR}' autoload='false' />
    <extension name='mcc' />
    <extension name='backoffice' />
    <extension name='commercesearchbackoffice' />
    <extension name='trainingfulfilmentprocess' />
	<extension name='trainingcore' />
	<extension name='trainingfacades' />
	<extension name='trainingtest' />
	<extension name='trainingstorefront' />
    <extension name='traininginitialdata' />
	<extension name='trainingcockpits' />
    <extension name='yaddon' />
    <extension name='ycommercewebservices' />
    <extension name='electronicsstore' />
    <extension name='apparelstore' />
    <extension name='captchaaddon' />
    <extension name='b2ccheckoutaddon' />
    <extension name='liveeditaddon' />
    <extension name='acceleratorwebservicesaddon' />
  </extensions>
</hybrisconfig>
Step 4: Run ant clean all
Run ant clean all command in the command prompt
Make sure the build is success
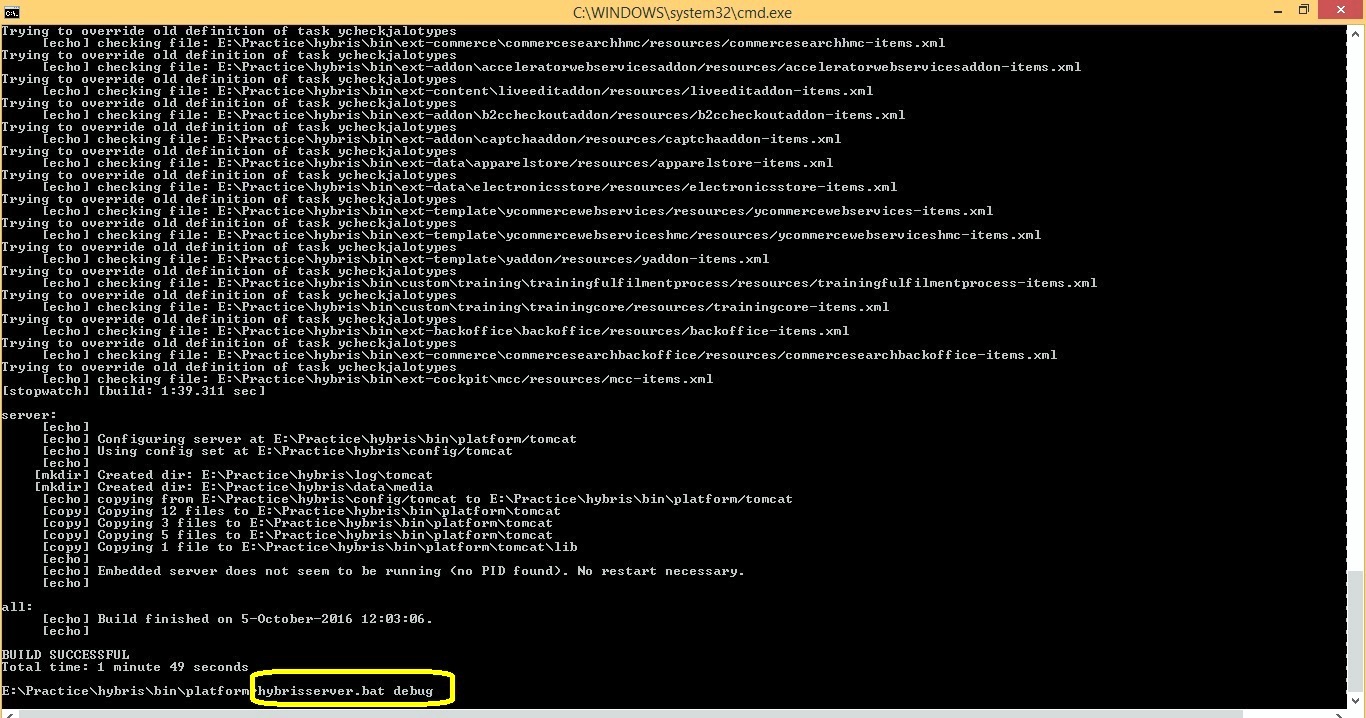
Step 5: Start the hybris server
Start the Hybris server using the below command
hybrisserver.bat debug
Step 6: Initialization
We can do the initialization of the system in 2 ways
a)Using below command in command prompt
ant initialize
b) Initialize from HAC directly.
Lets do it using HAC
Access the below url
http://localhost:9001
make sure Toggle all checkbox is selected.
click on initialize button and confirm the initialization
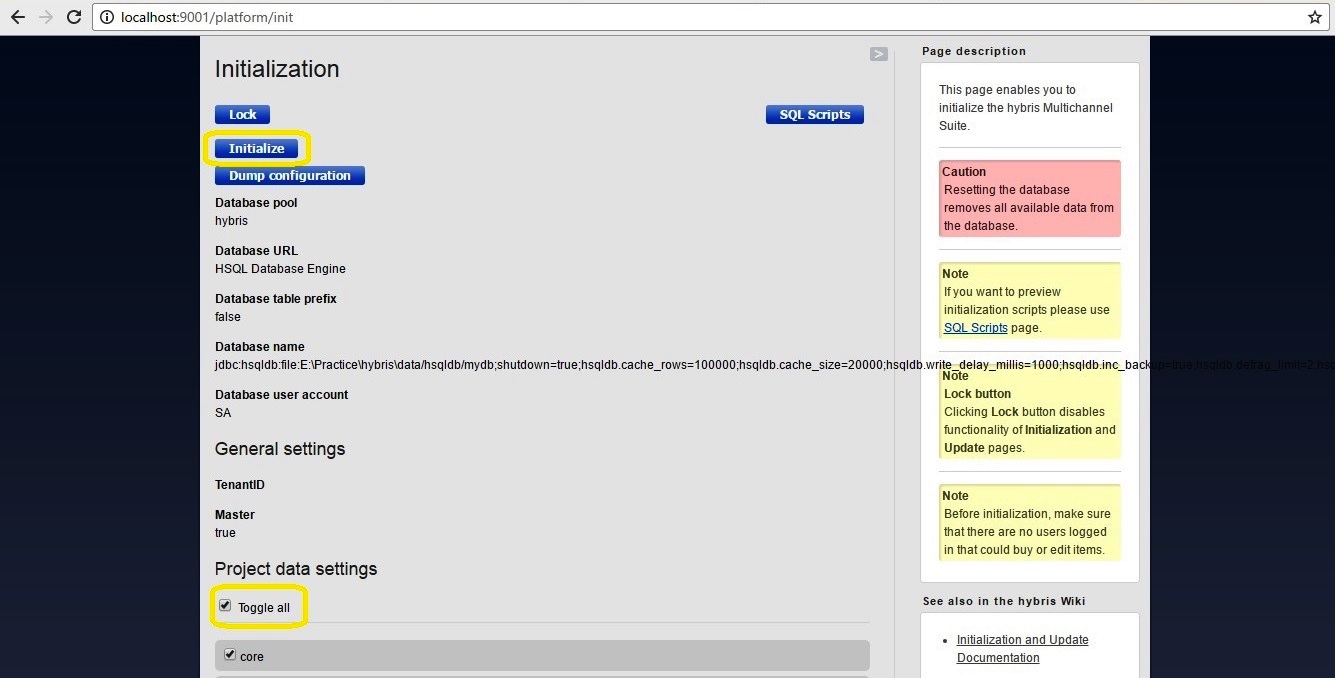
This will take considerable amount of time based on the system memory and processor as it creates new DB schema, tables and loads the configured data.
Wait till the initialization gets finished as shown in below image.

Step 7
Enter below URL mappings in Host file in the below path
C:\Windows\System32\drivers\etc
- 127.0.0.1 apparel.local
- 127.0.0.1 electronics.local
127.0.0.1   apparel.local
127.0.0.1   electronics.local
Step 8
Accessing sample sites
Now try to access the sample sites shipped with Hybris using below url
Apparel UK site
http://apparel.local:9001/trainingstorefront/?site=apparel-uk

Similarly access the below sites as well
Apparel-DE site
http://localhost:9001/ trainingstorefront/?site=apparel-de
Electronics site
http://localhost:9001/ trainingstorefront/?site=electronics
All these are sample B2C sites shipped by Hybris itself.
Once we are able to access these sites, we can confirm that we have installed and configured the hybris successfully in our local machine.

I am facing an issue when running command:
ant clean all
[echo] Running [npm config set loglevel silent]
[echo]
[echo] check verdaccio.cache: C:\Hybris\CXCOMCL221100U_6-70007431\hybris\bin\modules\npm-ancillary\npmancillary\resources\npm\verdaccio\.cache
[echo] verdaccio.cache is set to: false
[echo] Running [rush update –bypass-policy] on path C:\Hybris\CXCOMCL221100U_6-70007431\hybris\bin\modules\smartedit\smartedittools
[exec] The rush.json configuration requests Rush version 5.93.1
[exec] Transforming C:\Hybris\CXCOMCL221100U_6-70007431\hybris\bin\modules\smartedit\smartedittools\common\config\rush\.npmrc
[exec] –> “C:\Hybris\CXCOMCL221100U_6-70007431\hybris\bin\modules\smartedit\smartedittools\common\temp\install-run\@microsoft+rush@5.93.1\.npmrc”
[exec] Installing @microsoft/rush…
[exec]
[exec]
[exec] Error: Unable to install package: Error: “npm install” encountered an error
[exec]
[exec]
BUILD FAILED
C:\Hybris\CXCOMCL221100U_6-70007431\hybris\bin\platform\build.xml:13: The following error occurred while executing this line:
C:\Hybris\CXCOMCL221100U_6-70007431\hybris\bin\platform\resources\ant\compiling.xml:95: The following error occurred while executing this line:
C:\Hybris\CXCOMCL221100U_6-70007431\hybris\bin\platform\resources\ant\compiling.xml:153: The following error occurred while executing this line:
C:\Hybris\CXCOMCL221100U_6-70007431\hybris\bin\platform\resources\ant\util.xml:13: The following error occurred while executing this line:
C:\Hybris\CXCOMCL221100U_6-70007431\hybris\bin\platform\resources\ant\compiling.xml:160: The following error occurred while executing this line:
C:\Hybris\CXCOMCL221100U_6-70007431\hybris\bin\platform\resources\ant\compiling.xml:289: The following error occurred while executing this line:
C:\Hybris\CXCOMCL221100U_6-70007431\hybris\bin\platform\resources\ant\util.xml:142: The following error occurred while executing this line:
C:\Hybris\CXCOMCL221100U_6-70007431\hybris\bin\modules\smartedit\smartedittools\buildcallbacks.xml:167: The following error occurred while executing this line:
C:\Hybris\CXCOMCL221100U_6-70007431\hybris\bin\modules\npm-ancillary\npmancillary\buildcallbacks.xml:481: The following error occurred while executing this line:
C:\Hybris\CXCOMCL221100U_6-70007431\hybris\bin\modules\npm-ancillary\npmancillary\buildcallbacks.xml:131: exec returned: 1
Total time: 7 minutes 15 seconds
when I am trying to open store front it showing SERVER ERROR
on console it showing this error:
Caused by: de.hybris.platform.solrfacetsearch.solr.exceptions.SolrIndexNotFoundException: de.hybris.platform.servicelayer.exceptions.UnknownIdentifierException: Active index not found: {indexedType=SolrIndexedTypeModel (8796093057183@2), active=true, facetSearchConfig=SolrFacetSearchConfigModel (8796093057176@1)}
at de.hybris.platform.solrfacetsearch.solr.impl.DefaultSolrIndexService.getActiveIndex(DefaultSolrIndexService.java:215) ~[solrfacetsearchserver.jar:?]
at de.hybris.platform.solrfacetsearch.search.impl.DefaultFacetSearchStrategy.search(DefaultFacetSearchStrategy.java:137) ~[solrfacetsearchserver.jar:?]
… 141 more
Caused by: de.hybris.platform.servicelayer.exceptions.UnknownIdentifierException: Active index not found: {indexedType=SolrIndexedTypeModel (8796093057183@2), active=true, facetSearchConfig=SolrFacetSearchConfigModel (8796093057176@1)}
at de.hybris.platform.servicelayer.util.ServicesUtil.validateSingleResultWithType(ServicesUtil.java:68) ~[coreserver.jar:?]
at de.hybris.platform.servicelayer.util.ServicesUtil.validateIfSingleResult(ServicesUtil.java:34) ~[coreserver.jar:?]
at de.hybris.platform.solrfacetsearch.daos.impl.DefaultSolrIndexDao.findActiveIndexByConfigAndType(DefaultSolrIndexDao.java:66) ~[solrfacetsearchserver.jar:?]
at de.hybris.platform.solrfacetsearch.solr.impl.DefaultSolrIndexService.getActiveIndex(DefaultSolrIndexService.java:211) ~[solrfacetsearchserver.jar:?]
at de.hybris.platform.solrfacetsearch.search.impl.DefaultFacetSearchStrategy.search(DefaultFacetSearchStrategy.java:137) ~[solrfacetsearchserver.jar:?]
… 141 more
ERROR [hybrisHTTP24] [DefaultSolrFieldSearchFacadeStrategy] Facet search has failed
de.hybris.platform.solrfacetsearch.search.FacetSearchException: de.hybris.platform.servicelayer.exceptions.UnknownIdentifierException: Active index not found: {indexedType=SolrIndexedTypeModel (8796093057183@2), active=true, facetSearchConfig=SolrFacetSearchConfigModel (8796093057176@1)}
Try with this link
https://electronics.local:9002/yacceleratorstorefront/
Hello Sir,
I am trying to install the recipes (install.bat -r b2c_b2b_acc) and I am getting the below error:
“C:\Users\sony\Desktop\Hybris6.5\HYBRISCOMM66\installer>install.bat
-r b2c_b2b_acc
Java version: 1.8.0_231
ERROR: Cannot run program “C:\Hybris6.5\HYBRISCOMM66\installer\\gradlew.bat” (in the directory “C:\Hybris6.5\HYBRISCOMM66\installer”): CreateProcess error=2, The system cannot find the file specified ”
Could you please help me with resolving this error as the file “gradlew.bat” is already present in the installer folder?
It will be a great help to me as I am not able to proceed further.
Could you add some cockpit
/backoffice admin perspective work for custom models and attributes defined in items.xml . share some link to understand.thanks
Hi ,
I’ve extracted the hybris suit, and trying to run ant clean all commands with path
“…/hybris/HYBRISCOMM1808/hybris/bin/platform” but its failing saying that ‘ant’ is not recognized as an internal or external command
Please provide some solution
C:\Users\poorvigupta\Documents\hybris\HYBRISCOMM1808\hybris\bin\platform>setantenv.bat
C:\Users\poorvigupta\Documents\hybris\HYBRISCOMM1808\hybris\bin\platform>ant clean all
‘ant’ is not recognized as an internal or external command,
operable program or batch file.
Please check your environment variables.
Hi KB,
Please let me know if Hybris data Hub batch will start
Thank you…
Hiii
Hi Karibasappa,
Can you please explain the difference for b2b and b2c accelerators as the installation part is almost same, and also in scenarios where to choose the opt one.
Hi
It’s totally depend on business requirement.
Hi Karibasappa,
Can you please tell me the basic difference and high level working differences excluding the installations for b2b and b2c accelerators.
ERROR:
———-
ERROR [localhost-startStop-1] [DefaultSolrServerService] de.hybris.platform.solrserver.SolrServerException: Error while executing Solr start command for instance: [name: default, port: 8983]
WARN [localhost-startStop-1] [CloseAwareApplicationContext] Exception encountered during context initialization – cancelling refresh attempt: org.springframework.beans.factory.BeanCreationException: Error creating bean with name ‘defaultSolrServerService’ defined in class path resource [global-solr
server-spring.xml]: Invocation of init method failed; nested exception is de.hybris.platform.solrserver.SolrServerException: Error while executing Solr start command for instance: [name: default, port: 8983]
i got this error after starting the server
And i do the steps which are given by you for this error. Even though i am not able open the site URL
Please provide solution for me
What is name space?
what is the best way to migrate hybris b2c 5.6 to 6.7 ?
Hi KB Sir,
i ahve install 6.5 hybris suit using;
install.bat -r b2c_acc
install.bat -r b2c_acc initialize
install.bat -r b2c_acc start
server is started and initialization is done.
Able to open the electrinic site, But not able to place the order .
Any more setting and commands as to be run. plse let me known .
Thanks
Raghavendra
Hi,
When I trying to install the recipe b2c_acc_plus after going to the installer path
install.sh -R b2c_acc_plus
Its giving me : Command not found error 🙁
Please help me…
Go to installer
install.bat -r b2c_acc_plus
It should work.
Thanks
share the screenshot of the content of the folder recipes . Must be a folder called like b2c_acc_plus
Hello, I have a question
how to configure different page for different user?
Hi KB,
Could u pls let me know ear file location.Once we build extensions where ear is created so that Hybris server is deploying that ear.
Hello
very good explanation. Could you please help me with the below error.
can you please me with this build failed error while I am running command ant modulegen -Dinput.module=accelerator -Dinput.name=training -Dinput.package=com.hybris.training -Dinput.template=develop from platform folder prompt:
BUILD FAILED
c:\practice\hybris\bin\platform\build.xml:119: The following error occurred whil
e executing this line:
c:\practice\hybris\bin\platform\resources\ant\modulegen.xml:324: The following e
rror occurred while executing this line:
c:\practice\hybris\bin\platform\resources\ant\modulegen.xml:330: The following e
rror occurred while executing this line:
c:\practice\hybris\bin\platform\resources\ant\modulegen.xml:45: extgen.propertie
s in source extension not found! this is not a template!
Hi,
Can you please write an article on OCC integration with hybris step by step soon.
Thanks in advance!
hello. on hybris 6.7, i cant make b2b_acc work. It gives erro. i need b2b.
b2b module creates only 2 modules
I am doing the trail CustomizingProductSearchPage.
In merchandisefacades-spring.xml, hybris has an entry
what us modifypopulator list here? Cant find any solution
great tutorial
I have installed Hybris 5.5.1 version in my local .Can i patch 5.5.1.1 version on top of installed version (5.5.1)
Hi, I am from linux background and i need this installation in the linux ubuntu. Can you post an article about how to do in that in linux…
Hi KB, your tutorial on Hybris is really a great help, It run without any issues
I just followed your steps
Thanks a lot KB
-Vijay S Chandel
Hi,
I am not able to install hybris as my company is not partner SAP.
Can you help me .
Hi KB.
When i am doing ant clean all, i am getting the following error.
Failed to copy
D:\BallanceeHybris\hybris\bin\ext-accelerator\acceleratorstorefrontcommons\commonweb\src\de\hybris\platform\acceleratorstorefrontcommons\forms\verification\impl\DefaultAddressVerificationResultHandler.java
to
D:\BallanceeHybris\hybris\bin\custom\sealeswinslowpublicstorefront\web\commonwebsrc\acceleratorstorefrontcommons\de\hybris\platform\acceleratorstorefrontcommons\forms\verification\impl\DefaultAddressVerificationResultHandler.java
due to failed to create the parent directory for
D:\BallanceeHybris\hybris\bin\custom\sealeswinslowpublicstorefront\web\commonwebsrc\acceleratorstorefrontcommons\de\hybris\platform\acceleratorstorefrontcommons\forms\verification\impl\DefaultAddressVerificationResultHandler.java
Could you please help me.
Thanks in advance
Hi Is this error resolved. I am also getting same type of error
Hi KB,
Can we start the Hybris service in debug mode using installer.bat(not hybrisserver.bat)?
I am running from my mac machin getting following error.
Command
. ./install.sh –d b2c_acc_plus
dirname: illegal option — b
usage: dirname path
chmod: /gradlew: No such file or directory
Error: Could not find or load main class de.hybris.installer.CmdHandler
How to change url https://localhost:9002/mytraining/?site=electronics
to https://localhost:9002/
I just want to let you know that I really enjoy your website. All articles are very well written and extremely informative! Thank you so much. Keep up the good work!
Hi Karibasappa,
I am a beginner to Hybris ecommerce . I am trying to install Hybris cockpit. Can you please help me with the configuration steps. I have done configuration for Admin console and recipe.
There is nothing like Hybris cockpit installation, It comes with hybris installation only.
Just access the cockpits using the URL like below based on which cockpit you need to access
http://localhost:9001/productcockpit
http://localhost:9001/cmscockpit
I have added custom extensions for utilities in localextensions.xml along with their path so the entries are (along with other b2c extensions)
Buy when i am executing ant clean all, i am getting below error
java.lang.IllegalArgumentException: cannot merge namespace ((utilitiescore)) into (()) due to duplicate type code ‘genderlist’ : GenderList::((utilitiescore))::YCollectionType[utilitiescore-items.xml:17(CollectionTypeTagListener)]GenderList::((yacceleratorcore))::YCollectionType[yacceleatorcore-items.xml:17(CollectionTypeTagListener)]
Note: I installed the hybris commerce using recipe as b2b_acc and able to access the default strorefronts.
Hi
Issue is resolved as i had to remove some of the default extensions from my localextensions file which were referring to same type.
Hi Lalit,
could you please mention what are the default extensions that are to be removed from localextensions.
Anyone was able to figure out what are the default extensions that needs to be removed?
Hi kb,
after initialization i am getting this exception like BootstrapConfigException ,accelaratorfacades doesn’t specify a path and no scanned extension was matching the name
Hi,
Could you write some article on props table? how it is used and how to maintain it?
Thanks
Joe
Sure !!
Hi,
I did the installation but the UI is not same as yours which you have given for Fashion store
Hello
can you please me with this build failed error while I am running command ant modulegen -Dinput.module=accelerator -Dinput.name=training -Dinput.package=com.hybris.training -Dinput.template=develop from platform folder prompt:
BUILD FAILED
c:\practice\hybris\bin\platform\build.xml:119: The following error occurred whil
e executing this line:
c:\practice\hybris\bin\platform\resources\ant\modulegen.xml:324: The following e
rror occurred while executing this line:
c:\practice\hybris\bin\platform\resources\ant\modulegen.xml:330: The following e
rror occurred while executing this line:
c:\practice\hybris\bin\platform\resources\ant\modulegen.xml:45: extgen.propertie
s in source extension not found! this is not a template!
Same error:
[echo] Processing extension yb2bacceleratorstorefront
BUILD FAILED
C:\hybris_test\wcms\hybris\bin\platform\build.xml:117: The following error occurred while executing this line:
C:\hybris_test\wcms\hybris\bin\platform\resources\ant\modulegen.xml:334: The following error occurred while executing this line:
C:\hybris_test\wcms\hybris\bin\platform\resources\ant\modulegen.xml:340: The following error occurred while executing this line:
C:\hybris_test\wcms\hybris\bin\platform\resources\ant\modulegen.xml:55: extgen.properties in source extension not found! this is not a template!
Hi KB,
VG explanation.
I have one basic doubt, In the above steps “Go to installer path in command prompt and E:\practice\installer install.bat –r b2c_acc_plus”
Here do i need to create installer folder in practice folder ? Though i create install.bat will not find ? can you please explain i am bit confused here.
and if the command executes successfully does it creates any folders in installer folder?
Thanks in adv
Hi,
Same thing is explained in Step 2.
You dont need to create any folder, if you unzip hybris , it will be available automatically.
If we r performing initialization,first off all it create all existing data and recreates the same data..then why should we have to do initialization at the time accessing sample sites like electronics,appearals sites and etc..?
Its not required, you need to do initialization only once, later you can do update.
I have done only once in the above article.
Why are you thinking that you need to do initialization at the time of accessing sample sites like electronics,appearals sites and etc..?
Hi KB Sir,
Actually my doubt is why we have to do initialization…?it is just deleting and creates the same data then why should we have to doinitialization..?
Only once we have to initialize to get all the schema and tables to be created and data is imported.
Then onwards, if we do initalization , it will delete the old data and tables and recreate with available configuration.
So only one time initialization is preferred and do update rest of the time.
If you dont initialize one time also after taking hybris suite then how will you expect all the required tables and sample data available in your system ?
If we want to install another recipe, what will be the steps. In the above example you have installed b2c_acc_plus.
If we want to install another recipe like b2b_acc_plus, b2c_telco, what is the procedure. Please can you let us know.
We can install any recipe with the same steps, just provide the required recipe name
Go to installer path in command prompt
E:\practice\installer install.bat –r b2b_acc_plus
(syntax is install.bat –r recipeName)
Note : Make sure you use the right combination of recipe based on requirement, mixing up the B2B and B2C in the same suite is not recommended by hybris.
Thanks KB.
I tried mixing up B2B, B2C, B2B_ACC_PLUS, B2C_ACC_PLUS and everything got messed up. This time I just installed B2C_ACC_PLUS and it is working good.
So your recommendation is , for each different recipes we install it in different servers ?
ok thats great.
Its not for each different recipe , we can have related recipes together in one server but we should not mix up irrelevant recipes like mixing B2B with B2C etc..
Any one can help me out by sharing hybris 5.7 or 5.6 through google drive or dropbox. Because i am unable to download from sap marcket palce.
Hi Karibasappa,
I followed the same steps what you mentioned and everything successfully processed. But I am getting 404 error with http://localhost:9001/ trainingstorefront/?site=electronics.
Even with cuppy trail also I am getting the same error.
Thanks & Regards
Srinivas H J
Are you getting any error in the server console ?
Is it possible to get the details of multiple tables by using flexible search query.?
if yes
write a flexible search query to get the details of product and product features.
Thanks in Adv.
Yes, you need to do join for that.
Check joins in flexible query in wiki
Hi KB Sir,
I have installed hybris 6.0 software,but i am getting below error at the time server starting…..
but i did’t get any error at the time of receipe installation and ant clean all..
ERROR:
———-
ERROR [localhost-startStop-1] [DefaultSolrServerService] de.hybris.platform.solrserver.SolrServerException: Error while executing Solr start command for instance: [name: default, port: 8983]
WARN [localhost-startStop-1] [CloseAwareApplicationContext] Exception encountered during context initialization – cancelling refresh attempt: org.springframework.beans.factory.BeanCreationException: Error creating bean with name ‘defaultSolrServerService’ defined in class path resource [global-solr
server-spring.xml]: Invocation of init method failed; nested exception is de.hybris.platform.solrserver.SolrServerException: Error while executing Solr start command for instance: [name: default, port: 8983]
Please provide solution for me
I guess your system is using the port 8983, May be Solr instance is not properly shutdown.
Try to access below URL
http://localhost:8983/solr
If you’re able to access the solr server, then stop it by killing the process
If you don’t want to use Solr,then do below things
Add below code in local.properties file. This will prevent solr starting with TomCat server.
solrserver.instances.default.autostart=false
comment solrfacetsearch in the localextensions.xml.
Thanks KB sir,
i stopped solar server.Now its working..
Thank you so much sir
Great !!
You are welcome 🙂
you are doing a Excellent job… Please provide the data hub related topics as well that will help many people..
Thanks Pavan.
I will do it in sometime
Bro if possible update DATA HUB and integrations,
Thankyou
shine Jose
Ya Sure Bro..Will update it , give me some time.
Hi ,
I am not able see folders in Hybris HMC. I am able to login but am not able to see any folders in it.
Can you please let me know what can be the reason for it.
Hi,
Initialization was successful ?
It happens when system is not initialized properly.
And the error “Invalid column name ‘propstablename” is gone ?
Hi ,
The error : “Invalid column name ‘propstablename” is still not gone . It comes up when I use SQL Server with Hybris 6.2
I am able to connect to Hybris db from sql management studio but still I am facing this issue.
org.springframework.jdbc.BadSqlGrammarException: PreparedStatementCallback; bad SQL grammar [update hybris_dbydeployments set propstableName =’typesystemprops’ where propstablename NOT LIKE ‘%typesystemprops%’ AND name IN (‘ComposedType’, ‘AtomicType’, ‘CollectionType’, ‘MapType’, ‘AttributeDescriptor’, ‘EnumerationValue’) AND typesystemname=’DEFAULT’]; nested exception is com.microsoft.sqlserver.jdbc.SQLServerException: Invalid column name ‘propstablename’.
I am getting same error while performing ant initialize with MS SQL 2012 as Hybris DB. Please help me.
error:
[java] Caused by: org.springframework.jdbc.BadSqlGrammarException: PreparedStatementCallback; bad SQL grammar [update ydeployments set propstableName =’typesystemprop
where propstablename NOT LIKE ‘%typesystemprops%’ AND name IN (‘ComposedType’, ‘AtomicType’, ‘CollectionType’, ‘MapType’, ‘AttributeDescriptor’, ‘EnumerationValue’) AND
pesystemname=’DEFAULT’]; nested exception is com.microsoft.sqlserver.jdbc.SQLServerException: Invalid column name ‘propstablename’.
[java] at org.springframework.jdbc.support.SQLErrorCodeSQLExceptionTranslator.doTranslate(SQLErrorCodeSQLExceptionTranslator.java:231)
[java] at org.springframework.jdbc.support.AbstractFallbackSQLExceptionTranslator.translate(AbstractFallbackSQLExceptionTranslator.java:73)
[java] at org.springframework.jdbc.core.JdbcTemplate.execute(JdbcTemplate.java:649)
sri
can you plz provide the event and Listerine material with example .
aanji078@gmail.com
I don’t have, I will write article on it some time
Facing Hybris listner start error while trying to start hybris ( using SQL DB)
STATUS | wrapper | main | 2016/12/24 23:16:31.500 | Java Service Wrapper Professional Edition 64-bit 3.5.29
STATUS | wrapper | main | 2016/12/24 23:16:31.500 | Copyright (C) 1999-2016 Tanuki Software, Ltd. All Rights Reserved.
STATUS | wrapper | main | 2016/12/24 23:16:31.500 | http://wrapper.tanukisoftware.com
STATUS | wrapper | main | 2016/12/24 23:16:31.500 | Licensed to SAP SE for hybris Platform
STATUS | wrapper | main | 2016/12/24 23:16:31.500 |
STATUS | wrapper | main | 2016/12/24 23:16:31.860 | Launching a JVM…
INFO | jvm 1 | main | 2016/12/24 23:16:46.488 | org.springframework.jdbc.BadSqlGrammarException: PreparedStatementCallback; bad SQL grammar [update hybris_dbydeployments set propstableName =’typesystemprops’ where propstablename NOT LIKE ‘%typesystemprops%’ AND name IN (‘ComposedType’, ‘AtomicType’, ‘CollectionType’, ‘MapType’, ‘AttributeDescriptor’, ‘EnumerationValue’) AND typesystemname=’DEFAULT’]; nested exception is com.microsoft.sqlserver.jdbc.SQLServerException: Invalid column name ‘propstablename’.
INFO | jvm 1 | main | 2016/12/24 23:16:46.488 | at org.springframework.jdbc.support.SQLErrorCodeSQLExceptionTranslator.doTranslate(SQLErrorCodeSQLExceptionTranslator.java:231)
INFO | jvm 1 | main | 2016/12/24 23:16:46.503 | Dec 24, 2016 11:16:44 PM org.apache.catalina.core.StandardContext startInternal
INFO | jvm 1 | main | 2016/12/24 23:16:46.503 | SEVERE: Context [] startup failed due to previous errors
INFO | jvm 1 | main | 2016/12/24 23:16:46.503 | [32mINFO [localhost-startStop-1] [Licence] ##########################################################################
INFO | jvm 1 | main | 2016/12/24 23:16:46.503 | [m[32mINFO [localhost-startStop-1] [Licence] This Hybris licence is only for demo or develop usage and is valid for 30 days.
The exception says “Invalid column name ‘propstablename’.”
Are you connected to SQL DB before starting hybris server ?
Can you please let me know how can i check whether I am connected to SQL DB or not.
I am using Hybris 6.2 with SQL 2012.
My local.properties file look like this :
#Generated by hybris installer
#Thu Dec 22 21:44:24 PST 2016
recaptcha.publickey=
recaptcha.privatekey=
googleApiKey=
csrf.allowed.url.patterns=/[^/]+(/[^?]*)+(sop/response)$,/[^/]+(/[^?]*)+(merchant_callback)$,/[^/]+(/[^?]*)+(hop/response)$,/[^/]+(/[^?]*)+(language)$,/[^/]+(/[^?]*)+(currency)$,/(events)$
log4j.logger.de.hybris.eventtracking.publisher=DEBUG
piwik.tracker.url=
piwik.tracker.https.url=
eventtrackingwsaddon.events_endpoint.enabled=true
yprofileeventtrackingws.events_endpoint.enabled=true
spring.profiles.active=eventtrackingpublisher_develop
solrserver.instances.default.autostart=false
hac.webroot=/hac
db.url=jdbc:sqlserver://10.100.10.232:1433;responseBuffering=adaptive;loginTimeout=10
db.driver=com.microsoft.sqlserver.jdbc.SQLServerDriver
db.username=hybris
db.password=Swindon2010
db.tableprefix=hybris_db
sqlserver.enableLimitSupportForSQLServer2012=false
Connect to SQL Server using SQL Server Management Studio
Yes I am able to connect using SQL Server management studio
Great !!…you should be able to proceed now
I am able to get Hybris HMC /MCC login screen but when i login I am getting 404 – Page does not exist error in Hybris HMC/MCC
I have tried below resolution steps with no luck:
1) Adding HMC and MCC extensions in localextensions.xml file
2) )Adding hac.webroot=/hac and hmc.webroot=/hmc in local properties file
Kindly suggest on this.
I am using Hybris 6.2
Initialization was successful ?
im getting fatal error while starting the hybrisserver in debug mode
Can you please provide me more details on error
D:\hp\hybris-commerce-suite-5.5.1.0\hybris\bin\platform>hybrisserver.bat debug
Used config: D:\hp\hybris-commerce-suite-5.5.1.0\hybris\bin\platform\tomcat/conf/wrapper-debug.conf
–> Wrapper Started as Console
Java Service Wrapper Standard Edition 64-bit 3.5.24
Copyright (C) 1999-2014 Tanuki Software, Ltd. All Rights Reserved.
http://wrapper.tanukisoftware.com
Licensed to hybris software – http://www.hybris.com for hybris Platform
Launching a JVM…
FATAL ERROR in native method: JDWP No transports initialized, jvmtiError=AGENT_ERROR_TRANSPORT_INIT(197)
Java HotSpot(TM) 64-Bit Server VM warning: ignoring option MaxPermSize=300M; support was removed in 8.0
ERROR: transport error 202: bind failed: Permission denied
ERROR: JDWP Transport dt_socket failed to initialize, TRANSPORT_INIT(510)
JDWP exit error AGENT_ERROR_TRANSPORT_INIT(197): No transports initialized [debugInit.c:750]
JVM exited while loading the application.
Reloading Wrapper configuration…
Launching a JVM…
FATAL ERROR in native method: JDWP No transports initialized, jvmtiError=AGENT_ERROR_TRANSPORT_INIT(197)
Java HotSpot(TM) 64-Bit Server VM warning: ignoring option MaxPermSize=300M; support was removed in 8.0
ERROR: transport error 202: bind failed: Permission denied
ERROR: JDWP Transport dt_socket failed to initialize, TRANSPORT_INIT(510)
JDWP exit error AGENT_ERROR_TRANSPORT_INIT(197): No transports initialized [debugInit.c:750]
JVM exited while loading the application.
There were 5 failed launches in a row, each lasting less than 300 seconds. Giving up.
There may be a configuration problem: please check the logs.
This error can be happen in any of the below situations
1)Other application might have taken the Tomcat’s port and hence port might not be available for hybris embedded tomcat.
This mainly happen during Debug, try starting server in normal mode
In this case, try to change the tomcat port
2)In host file, below entry might be using, make sure you have this entry
127.0.0.1 localhost
Hi ,
When I try to run command : install.bat –r b2c_acc_plus it gives me below error :
C:\Hybris\installer>install.bat -r b2c_acc_plus
‘javac’ is not recognized as an internal or external command,
operable program or batch file.
Error: Could not find or load main class JavaVersionChecker
ERROR: 0
usage: install.bat [options…]
options:
-d,–debug set Gradle log level to debug
-h,–help print help
-i,–info set Gradle log level to info
-l,–list-recipes list all available recipes
-L,–build-log write build log into a file located under “logs” fol
der
-P,–platform-home sets platform home to directory
-r,–recipe executes default “setup” task in recipe named
-s,–stacktrace print out the stacktrace for all exceptions
-t,–tasks list all tasks in recipe named
Common examples:
-r Sets up system but leaves it uninitialized
-r initialize Initializes system
-r start Starts the hybris server
But i am able to run java -version command .
C:\Hybris\installer>java -version
java version “1.8.0_111”
Java(TM) SE Runtime Environment (build 1.8.0_111-b14)
Java HotSpot(TM) 64-Bit Server VM (build 25.111-b14, mixed mode)
All enviornment variables are set properly .
Please help to fix this
Hi , Can you open the command prompt with admin and try it.
Hybris is stuck in localizing types under intialation. There is no error. It is not going ahead of localizing types in initialization phase.
Please help
What is the RAM and processor configuration you are using ?
you got any reason/resolution?, I am facing this same issue on a newer setup
Hi Karibasappa,
As per suggested, i have changed the mysql table type as mysql.tabletype=MyISAM from innoDB..
I m using Mysql 5.7 with Hybris 5.7…
But still the same problem persists during initializing….its gets stuck with an exception: Caused by: com.mysql.jdbc.exceptions.jdbc4.MySQLSyntaxErrorException: Table ‘hybris_test.props’ doesn’t exist
Hi Sachin,
This looks different exception, we are on track now.
After installing MySql DB , have you created the database called “hybris_test” in your local ?
Yes i have created the table ‘hybris_test’ and during initializing i get Table ‘hybris_test.props’ doesn’t exist, also there are only somewhere around 218 tables (which usually all the table names are from a-z, mine stops somewhere around ‘r’)…not initialized completely…
Please provide your db config details,Let me check it.
This is my local properties
#Generated by hybris installer
#Thu Oct 20 16:12:55 IST 2016
recaptcha.publickey=
recaptcha.privatekey=
commerceservices.default.desktop.ui.experience=desktop
##### — Database settings for MySQL 5.1 — #####
#db.url=jdbc:mysql://localhost/hybris_test?useConfigs=maxPerformance&characterEncoding=utf8&useSSL=false
#db.driver=com.mysql.jdbc.Driver
#db.username=boltcms
#db.password=welcome1
#db.tableprefix=
#db.customsessionsql=SET SESSION TRANSACTION ISOLATION LEVEL READ COMMITTED;
#mysql.optional.tabledefs=CHARSET=utf8 COLLATE=utf8_bin
#mysql.tabletype=MyISAM
#mysql.allow.fractional.seconds=true
My localextensions.xml
If im using Default project.properties:
i have not done any changes to this file:
db.url=jdbc:hsqldb:file:${HYBRIS_DATA_DIR}/hsqldb/mydb;shutdown=true;hsqldb.cache_rows=100000;hsqldb.cache_size=20000;hsqldb.write_delay_millis=1000;hsqldb.inc_backup=true;hsqldb.defrag_limit=2;hsqldb.nio_data_file=false
db.driver=org.hsqldb.jdbcDriver
db.username=sa
db.password=
db.tableprefix=
hsqldb.usecachedtables=true
i have added local extensions , the code is not getting displayed..
I have checked your MYSQL details.
1) In db.url, you have not specified port number(default 3306),Please specify the port number in url.
2) set innodb_flush_log_at_trx_commit to 0 by using MYSQL administrator or by editing my.cnf config file
Thanks!!
Is it just like this, please correct:
db.url=jdbc:mysql://localhost:3306/hybris_test?useConfigs=maxPerformance&characterEncoding=utf8&useSSL=false
and in \etc\mysql\mysql.conf.d\mysqld.cnf where i have msql configuration… i have added
# * InnoDB
innodb_flush_log_at_trx_commit= 0
post that i ant all, started the sever and ant initialize, still i get Caused by: java.sql.BatchUpdateException: Table ‘hybris_test.props’ doesn’t exist and doesnt initialize… 🙁
put these attribute in local.properties file if not yet set.
In case you have not run Mysql in safe mode, just use below commands and run it and see
I get during the server start: ERROR [solr indexer thread] (update-electronicsIndex-cronJob) [DefaultIndexerWorker] [Indexer worker 2 (UPDATE index operation on electronicsIndex/Product)] failed to process index items due to Failed to index item with PK 8796093251585: No bean named ‘promotionImageValueProvider’ is defined
de.hybris.platform.solrfacetsearch.indexer.exceptions.IndexerException: Failed to index item with PK 8796093251585: No bean named ‘promotionImageValueProvider’ is defined
Error during indexer call: electronicsIndex
[DefaultSetupImpexService] Importing [/apparelstore/import/sampledata/productCatalogs/apparelProductCatalog/products_de.impex]… FAILED
Whats the impex error ?
Check whether following bean is defined in your custom_core -spring.xml
If not defined then your Hybris suite is corrupted as its OOTB bean.
Where can i find the file custom_core -spring.xml?
My promotionImageValueProvide is defined in my spring.xml
Neither of my custom module were loading…not even just http://:9001/mytraining
have you added them in localextensions.xml ?
yes here is my localextension file after running modulegen
where it is ? I could not see it.
Is it having all your custom extensions ?
not sure why many codes are not pasted here in the comments, many are missing though…
Hi Karibasappa, Thanks for the useful post…I am facing few issue like when i hit http://:9001/platform/extensions…electrnicsstore and other custom extensions were not loaded(had an X mark in HMC column ).. as a result on hitting http://:9001/mytraining/?site=electronics i get 404 page…could you please suggest
Hi Sachin
The url which you are hitting is not correct
it should be like
http://localhost:9001/platform/extensions
localhost is missing in your both the urls.
Sorry forgot to update the url : im using linux : http://:9001/ is my URL…
So its something like : http://:9001/mytraining/?site=electronics which says 404
** http://:9001/mytraining/?site=electronics
Even if you use linux, The url will not change
it should have host name but in your url, i could not see the host name.
it should be like
http://localhost:9001/mytraining/?site=electronics