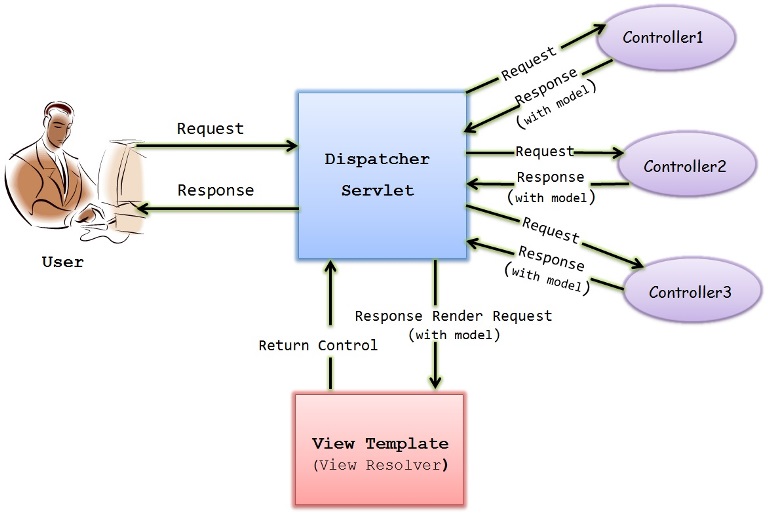
Spring MVC Architecture

Front Controller
This is the Dispatcher servlet controller also called as Front controller which is the main controller which manages the flow of the Spring MVC application.
This is defined in the web.xml as below
- <web-app>
- <servlet>
- <servlet-name>Dispatcher-Servlet</servlet-name>
- <servlet-class>org.springframework.web.servlet.DispatcherServlet</servlet-class>
- <load-on-startup>1</load-on-startup>
- </servlet>
- <servlet-mapping>
- <servlet-name> Dispatcher-Servlet </servlet-name>
- <url-pattern>/</url-pattern>
- </servlet-mapping>
- </web-app>
<web-app>
    <servlet>
        <servlet-name>Dispatcher-Servlet</servlet-name>
        <servlet-class>org.springframework.web.servlet.DispatcherServlet</servlet-class>
        <load-on-startup>1</load-on-startup>
    </servlet>

    <servlet-mapping>
        <servlet-name> Dispatcher-Servlet </servlet-name>
        <url-pattern>/</url-pattern>
    </servlet-mapping>

</web-app>
So Dispatcher servlet is defined and mapped to the url pattern /, which means all request must go through Dispatcher servlet.
Controller
Controller is the one which handles the specific request which is mapped by its request mapping.
Example
- @Controller
- Public class A{
- @RequestMapping(“/login”)
- Public void login(){
- //do whatever you want
- }
- }
@Controller
Public class A{
          @RequestMapping(“/login”)
          Public void login(){
                                      //do whatever you want
                              }
             }
So every controller class will be annotated with @controller and each of its method is mapped to some request url.
Model
Model is the class which holds the data to transfer between view and controller.
Anything in the view is transferred to controller using model class and vice versa.
View Template
Specific view for the corresponding request is displayed based on the view resolver, it helps in finding the exact view name.
Steps to create spring mvc application
1) Define the dispatcher servlet in web.xml
2) Create spring configuration file and define the packages to scan for spring beans
3) Create a simple JSP page which will have a form request to be submitted.
4) Create the controller class which will have a method to map a particular request.
5) Create the model class which can hold the form data.
6) Define view resolver in spring configuration file
7) Create the view page(.jsp) to hold the response from the controller.
Flow of spring mvc application will be as below
1) User Makes a request through an URL
2) URL is passed to dispatcher servlet
3) Dispatcher servlet passes the request to the corresponding controller based on url mapping.
4) Controller performs the task and return the model and view.
5) Dispatcher servlet maps the view name to the corresponding jsp(any view technology) using view resolver.
6) View renders the model and display it.

Hi Raj , Nice article keep up the good work.
I have also written an article on the same topic hope this will help your audience too
https://getinputs.com/spring-mvc-flow-overview/
Please let me know if i can write a guest post for you .
hello sir i want to learn java fast will u brief me
very nice practical explanations keep it up but there is no core collection frame work
Will be adding soon,, work in progress !!
you’re awesome
Hi Kb,
A bit confused about the usage of “alias” tag. Could you give a brief explanation.
Simple And Superb Explanation ………Thanks
Thank you so much !!
Thanks a lot……Nice Post 🙂
Thank you !!
Happy reading 🙂
Nice Kb!!!
Thanks Vivek….Keep reading !!
thnks … nice post….!
Thank you, happy reading 🙂