Hello world Rest Service project
Creating Hello world project with JAX-RS and Jersey
Tools and Technologies used

Step 1
Create a new maven Project in Eclipse
In Eclipse,Go to File => New => Other
Select Maven project
Name the project as “JerseyHelloWorld”
Select the archetype as maven-archetype-webapp and click on Next
Provide Group Id, Artifact Id and package details as below
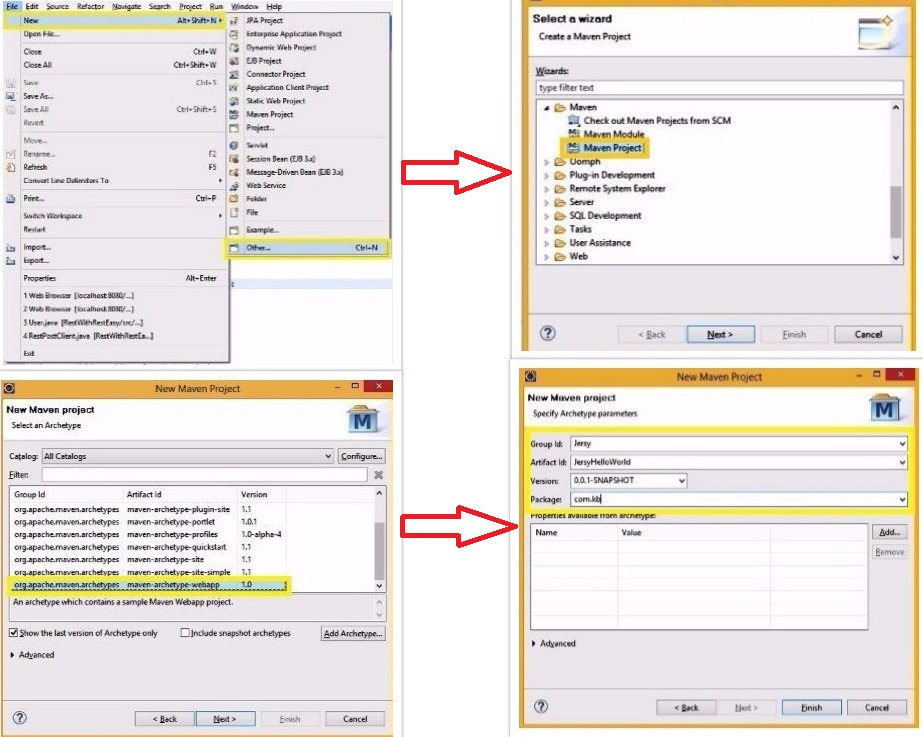
Click on Finish.
Step 2
Add the Jersey server dependency to pom.xml
Jersey server is one of the widely used implementation of JAX-RS and hence we will use Jersey implementation in this project.
for details on What is JAX-RS and Jersey, please go through JAX-RS article.
- <project xmlns="http://maven.apache.org/POM/4.0.0"
- xmlns:xsi="http://www.w3.org/2001/XMLSchema-instance"
- xsi:schemaLocation="http://maven.apache.org/POM/4.0.0
- http://maven.apache.org/maven-v4_0_0.xsd">
- <modelVersion>4.0.0</modelVersion>
- <groupId>Jersy</groupId>
- <artifactId>JersyHelloWorld</artifactId>
- <packaging>war</packaging>
- <version>0.0.1-SNAPSHOT</version>
- <name>JersyHelloWorld Maven Webapp</name>
- <url>http://maven.apache.org</url>
- <dependencies>
- <dependency>
- <groupId>junit</groupId>
- <artifactId>junit</artifactId>
- <version>3.8.1</version>
- <scope>test</scope>
- </dependency>
- <dependency>
- <groupId>org.glassfish.jersey.containers</groupId>
- <artifactId>jersey-container-servlet</artifactId>
- <version>2.24</version>
- </dependency>
- <!-- https://mvnrepository.com/artifact/javax.servlet/servlet-api -->
- <dependency>
- <groupId>javax.servlet</groupId>
- <artifactId>servlet-api</artifactId>
- <version>2.5</version>
- </dependency>
- </dependencies>
- <build>
- <finalName>JerseyHelloWorld</finalName>
- </build>
- </project>
<project xmlns="http://maven.apache.org/POM/4.0.0"
     xmlns:xsi="http://www.w3.org/2001/XMLSchema-instance"
     xsi:schemaLocation="http://maven.apache.org/POM/4.0.0
     http://maven.apache.org/maven-v4_0_0.xsd">
  <modelVersion>4.0.0</modelVersion>
  <groupId>Jersy</groupId>
  <artifactId>JersyHelloWorld</artifactId>
  <packaging>war</packaging>
  <version>0.0.1-SNAPSHOT</version>
  <name>JersyHelloWorld Maven Webapp</name>
  <url>http://maven.apache.org</url>
  <dependencies>
    <dependency>
      <groupId>junit</groupId>
      <artifactId>junit</artifactId>
      <version>3.8.1</version>
      <scope>test</scope>
    </dependency>

   <dependency>
    <groupId>org.glassfish.jersey.containers</groupId>
    <artifactId>jersey-container-servlet</artifactId>
    <version>2.24</version>
   </dependency>

<!-- https://mvnrepository.com/artifact/javax.servlet/servlet-api -->
   <dependency>
    <groupId>javax.servlet</groupId>
    <artifactId>servlet-api</artifactId>
    <version>2.5</version>
   </dependency>

 </dependencies>

 <build>
    <finalName>JerseyHelloWorld</finalName>
  </build>
</project>
We have added dependencies for Jersey servlet ,servelt api and Junit in the above pom file.
Step 3
Update web.xml file with Jersey servlet container
we have defined a special servlet called “jersey-serlvet” in web.xml and mapped it by the URL pattern /rest/*
So just like any other servlet in web application,any request matching with the given pattern i.e /rest/* will be redirected to “Jersey servelt”.
- <!DOCTYPE web-app PUBLIC
- "-//Sun Microsystems, Inc.//DTD Web Application 2.3//EN"
- "http://java.sun.com/dtd/web-app_2_3.dtd" >
- <web-app>
- <display-name>Archetype Created Web Application</display-name>
- <servlet>
- <servlet-name>jersey-serlvet</servlet-name>
- <servlet-class>org.glassfish.jersey.servlet.ServletContainer</servlet-class>
- <init-param>
- <param-name>jersey.config.server.provider.packages</param-name>
- <param-value>com.kb.rest</param-value>
- </init-param>
- <load-on-startup>1</load-on-startup>
- </servlet>
- <servlet-mapping>
- <servlet-name>jersey-serlvet</servlet-name>
- <url-pattern>/rest/*</url-pattern>
- </servlet-mapping>
- </web-app>
<!DOCTYPE web-app PUBLIC
      "-//Sun Microsystems, Inc.//DTD Web Application 2.3//EN"
      "http://java.sun.com/dtd/web-app_2_3.dtd" >

<web-app>
	<display-name>Archetype Created Web Application</display-name>
	<servlet>
		<servlet-name>jersey-serlvet</servlet-name>
		 <servlet-class>org.glassfish.jersey.servlet.ServletContainer</servlet-class>
		<init-param>
			<param-name>jersey.config.server.provider.packages</param-name>
			<param-value>com.kb.rest</param-value>
		</init-param>
		<load-on-startup>1</load-on-startup>
	</servlet>

	<servlet-mapping>
		<servlet-name>jersey-serlvet</servlet-name>
		<url-pattern>/rest/*</url-pattern>
	</servlet-mapping>

</web-app>
We have also provided the package of java classes(to be qualified as Rest services) under init-param tag.
This package will be considered by Jersey servlet container to identify the actual service when the request comes in.
Step 4
Create the Hello world Rest service
- package com.kb.rest;
- import javax.ws.rs.GET;
- import javax.ws.rs.Path;
- import javax.ws.rs.Produces;
- import javax.ws.rs.core.MediaType;
- @Path("/hello")
- public class HelloWorldRestService {
- @GET
- @Produces(MediaType.TEXT_PLAIN)
- public String getMessage(){
- return "Hello World";
- }
- }
package com.kb.rest;

import javax.ws.rs.GET;
import javax.ws.rs.Path;
import javax.ws.rs.Produces;
import javax.ws.rs.core.MediaType;

@Path("/hello")
public class HelloWorldRestService {

	@GET
	@Produces(MediaType.TEXT_PLAIN)
	public String getMessage(){
		return "Hello World";

	}
}
@Path – to specify the root path of the resource which is “/hello”
@GET – It’s the HTTP method that is supported by the service
@Produces – It’s used to specify the MIME type that service is returning to client which is Plain Text here.
Note: We can see that the package of this class is “com.kb.rest” which is configured in web.xml
Step 5
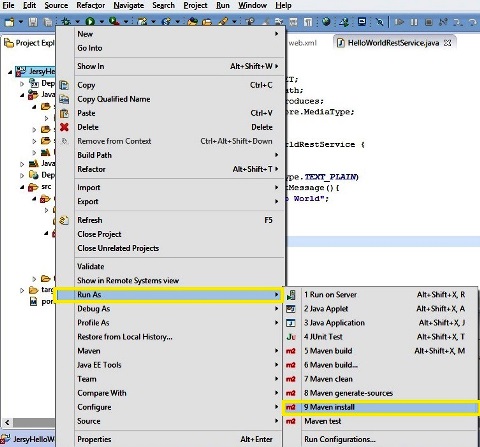
Build the project
Right click on Project and select Run as Maven install and make sure that build is success.
Step 6
Deploy the project in the Tomcat server
Right click on server and select Add and Remove
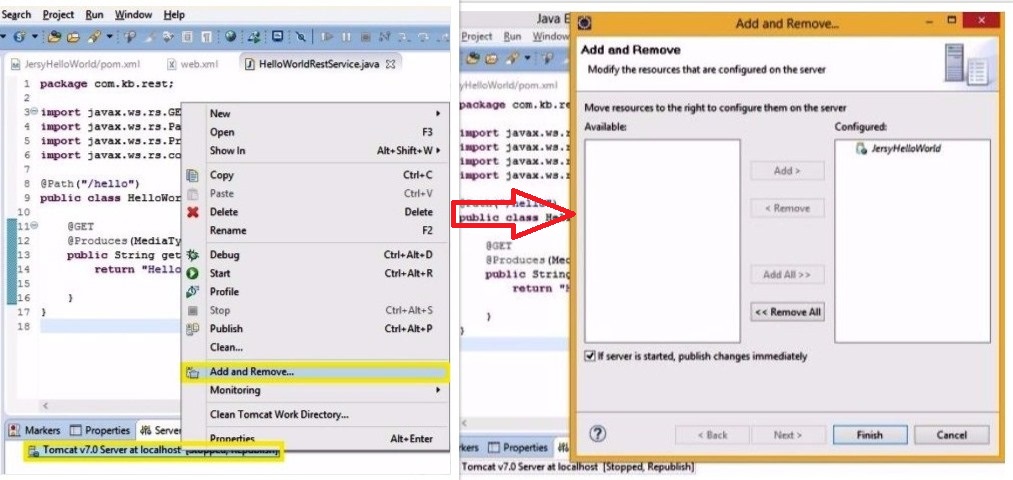
Step 7
Start the server
Step 8
Access the Rest service using below URL
http://localhost:8080/JerseyHelloWorld/rest/hello
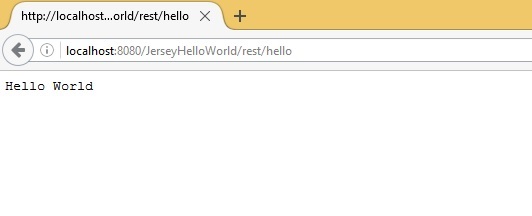
http://localhost:8080/JerseyHelloWorld -> project context path
/rest -> URL pattern that can be handled by Jersey servlet as configured in web.xml
/hello -> The @Path resource mapping string which is pointing to HelloWorldRestService.java as defined in that class.

I had the same problem for a couple of days. Somehow it fixed itself – no idea how.
But in experimenting I found that:
1) http://localhost:8080/JerseyHelloWorld fires up index.jsp
2) http://localhost:8080/JerseyHelloWorld/rest/hello executes HelloWorldRestService.java
the same issue..
Hi KB,
I am facing error Http 404 when try to hit http://localhost:8080/JerseyHelloWorld/rest/hello
and successful hit http://localhost:8080/JerseyHelloWorld/
Plz help
Amish
Nice one